Tag Archives: WordPress Ecommerce

How To Sell Anything Online With WordPress Ecommerce?

WordPress Ecommerce is a bundled product integrated with intelligent features to help you start and manage every aspect of your eCommerce website on your own.

You can start your online store to start selling your physical or digital products, it not takes more than an hour to give you a nice website that is mobile-friendly and can also be extended to a smartphone app.

Start By Registering Your Domain Name

Your domain name is your address on the internet. Anyone who types it on a web browser or search engine will come to your website. So the first thing you need to do before starting any kind of website is registering your full name or your business name as your domain.

You may use the extension .com, or .net, or go for your country-specific extension. There are many more extensions available such as .store which can be a good fit for your online selling business.

Subscribe To WordPress Ecommerce To Launch Your Website

The next thing you need to do is subscribe to WordPress Ecommerce and its automated system will let you make your eCommerce website.

The eCommerce website is your online storefront that serves your customers when they visit your website.

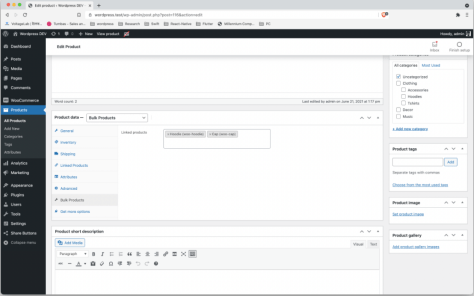
Making an online store is easier with WordPress Ecommerce, you can do it for yourself or for others to build a new source of income. Once you subscribe to WordPress Ecommerce, its step-by-step process will take you to the admin panel of your website.

There you can add your products, and select a shipping and payment method to finally list your products online for sale on your website.

Managing Your Products & Shipping

Physical and digital products can be managed online from your WordPress Ecommerce dashboard.

If you sell physical goods then you will also need to manage the tasks of storing and packaging your products for shipment. You can ship the packages directly from your home by subscribing to a courier service.

WordPress Ecommerce offers you an API integration option to integrate shipping and courier services on your website.

You may not need to subscribe to a courier service if you deal in a small area or own a local store. You may enable the store pickup option to let your customers pick up their packages directly from your home or store. And you can hire someone for delivering packages to nearby locations.

Managing Payment Gateways

You can manage payment methods from the admin panel of your website. General payment methods such as pay-on delivery, and direct bank transfer are already available, you simply need to activate them from the WooCommerce -> Settings page on the dashboard of your website.

You can easily accept payments by using popular payment gateways such as Stripe and PayPal for debit cards, and credit cards payments. The option is there on your website.

Other payment methods can be integrated with the help of API which can be obtained from the third-party payment gateway service. All prevalent payment and shipping services already provide you plugins that you can easily install-activate on your WordPress Ecommerce website for integrating their payment option.

For any support in setting up your website or working on it, you may call the customer support number. The experts are always available to help you out.

What Makes WordPress Ecommerce Best For Starting Your Online Store?

WordPress Ecommerce is based on the two dominant web technologies i.e. WordPress and WooCommerce and then it is repacked with other essential technologies you need for running your online store. This makes WordPress Ecommerce a one-stop solution for running any kind of eCommerce business.

Hence, to start selling online, you simply need to register your domain name and then subscribe to the WordPress Ecommerce plan, and you will get an SEO-optimized full-featured online store. You will not need to buy anything else, not even web hosting, backup service, or online support. Everything can be managed from the control panel of your Sangkrit.net account.

Easily Add & Update Products

WordPress Ecommerce gives a hassle-free selling experience, it lets you easily add and update products, set their price, or tick them to special sales and offers. You can easily specify rates and make automatic tax calculations based on your country’s taxing system.

Sell Globally Or Locally In Your Region

Small business owners can set a limitation by assigning a location where they want to do business. By using the geolocation option you can auto-identify the location of your client by detecting his IP so that you can perform delivery or restrict certain products and services depending on the user’s location.

Advanced Shipping Options & Rates

Apart from integrating a courier service provider, or utilizing govt. speed post option, you can also use local shipping options such as pickup from your store or nearby location. Set shipping costs over different products and their variations, offer free shipping to nearby places, or restrict shipping based on customer’s location.

Preinstalled Payment Gateways

You can accept payment by pay-on-delivery option, by using popular payment gateways such as stripe and PayPal, debit cards, credit cards, or via direct bank transfer.

Preinstalled SSL HTTPS Encryption

The SSL certificate is pre-installed on your website so you don’t have to go through the lengthy process of getting your SSL approved and then configured over your website so that you can secure online transactions and activities that happen on your website.

Malware Scanning, Removal & Repair System

The built-in malware scanner scans your website on daily basis and the malware removal and hack repair tool help you to fix your website during emergencies so that you don’t need to hire someone else for that.

Website Backup With One Click Restore

With secure built-in hosting, you also get a website backup service that keeps a regular backup of your website. This backup can be restored anytime with one click.

WordPress Ecommerce is different than all other WordPress & WooCommerce hostings because it bundles everything you need to start and grow your online business.

You also get free access to premium WooCommerce storefront design themes and over $1,500 of WooCommerce add-on extensions.

Most of the things you see on a good eCommerce website such as displaying related and recommended products and highlighting good offers and sales work automatically when you make your website with WordPress Ecommerce.

How To Add FAQ Section On Products In WordPress Ecommerce Website?

You can set a section for frequently asked questions generally known as FAQs on the single product page on your WordPress Ecommerce website.

Before we start you should know that anyone can make his eCommerce website by registering his domain name and then subscribing to the WordPress Ecommerce plan which can be enhanced with free plugins available in the WordPress plugin repository.

This lesson is on the new WooComerce plugin you can use on your WordPress Ecommerce installation to easily add a FAQ section to offer answers to some common questions that will help the customer to understand your product better.

Install-activate the new WordPress plugin called Product FAQ For WooCommerce. Upon activation, visit the plugin page from the Dashboard -> Product FAQ section.

Here you can enable the section, and set its position, color and heading. Once enabled, you will be able to add your FAQs on every product page.

How To Enable Wishlist On Your WordPress Ecommerce Website?

A wishlist works as a clickable icon on product screens over eCommerce websites that let customers save their products for future purchase so that they can quickly find them whenever they want.

In previous lessons, you have learned that anyone can create his online shop himself by subscribing to WordPress Ecommerce. Now this lesson explains how you can add a wishlist option for your users.

You simply need to log in to your WordPress Ecommerce website and then install-active a plugin called YITH WooCommerce Wishlist. Upon activation, the plugin adds a heart-shaped wishlist icon on products.

The plugin also offers you customization options where you can customize the columns that are shown on the wishlist table. It works for product variations too which means if some products have certain variations such as color or size variation, the plugin will let the user add his specific variation product to his wishlist.

Always Prioritize Your Own Ecommerce Website Than Any Marketplace

Selling your services or products on your website is one source of income. Selling them on other eCommerce marketplaces is another source of income that you cannot rely on as it can stop anytime in case you violate any of their terms and conditions.

So make yourself liberated by starting your own eCommerce website. You may use other marketplaces if they are profitable for you but always prioritize your own eCommerce website as that gives you complete control over your business.

Establish Your Own Name In The Market

The second source of income i.e. selling on the eCommerce marketplaces might give you more orders during the early phase of your business but it won’t let you establish your name in the market.

To stand out in the crowd you will need to establish your own identity on the internet, otherwise, you will get lost in the competition. So register and work from your own domain name.

For example, All marketplaces give very minimal options for seller profile personalization. Establishing an online identity cannot happen on someone else website. On other websites, you don’t really establish your identity instead you work under their name.

Let’s say you visit any eCommerce website for purchasing a smartphone. You will see that there are some known vs unknown companies. You will easily recognize known companies because they know they cannot establish their identity only by selling on some eCommerce marketplace. You will find that they all have their own website. They make a profit from other eCommerce marketplaces but they are not dependent on them.

Empower Your Right Source Of Income

So always work for empowering your first source of income i.e. selling products from your own domain because that will take you into the safe zone of business. You will define your own style of selling and decide your terms & conditions instead of following someone else.

For example, Dominos has its own eCommerce app with a food delivery service and it doesn’t rely on the largest food delivery services out there.

Yes, Dominos’s customers use other food delivery apps too but when it comes to placing orders with Dominos, they generally use its original app instead of any other app. Even if the largest food delivery companies fall, Domino’s service will stay unaffected.

So Make Your Own Ecommerce Website Today

You simply need to register your domain name and subscribe to WordPress Ecommerce and you would be able to make your own eCommerce website without hiring any web development professional.

WordPress Hosting Is Easiest Way To Build Website For Your Business

Launching a website is an easy way to put your business online and it becomes even easier with Managed WordPress. You can showcase your products, and services, share posts, videos, and images, sell using the eCommerce option, and make it easy for people to know about your business.

Creating a website builds a strong online presence for your business and is going to help you reach new prospects, as well as engage old ones. To bring your business online, start considering what you want your customers to do. So that you can present your website in a way that can increase your income.

You want customers to buy your products online

You are in a selling business and now you want your customers to buy your products online so that you can sell more products and increase your income. This can easily be done by setting up an eCommerce website.

Simply start by registering your domain name and subscribing to WordPress Ecommerce. It lets you set up your eCommerce shop on your own. WordPress Ecommerce is specially packed with all needful features you need to start an online store. These features include online payment methods, setting limitations on delivery which is helpful when you are dealing with a fixed area or region, adding a courier service, etc.

You want customers to visit your store in person

Suppose you are in a business that needs your customers to visit you in person. To encourage customers to visit you, and why visit only you, not your competitors you can set up a website with Managed WordPress adding information about your services and Map location so that they can find you and visit you when you are open.

On such a website, you can create multiple pages having your business information, testimonials i.e. what others say about your business, and a contact option which can be an online message or phone call button.

You want customers to book appointments

If you are a professional who wants customers to book an appointment with you you can do it by subscribing to Website Builder or Managed WordPress. The appointment can be made to visit you in person, book a call appointment, or have a video conference.

This can be done easily with Managed WordPress without making you pay heavy development charges. There are many free WordPress plugins that you can install after subscribing to a Managed WordPress plan.

You want to build a good relationship with customers

When you don’t want your customers to forget you once their work is done and make them come back to you for new products, deals, and services, you can make them register to your website and keep them sending updates on new offers.

This can be done simply by starting a blog on WordPress Hosting. You can blog about new offers and things that happen in your business. You can let them know about your posts by letting them subscribe to your blog which is done by adding their email or you can simply send them messages on mobile messenger.

What Webhosting Do I Need?

Web hosting provides you space for hosting your domain. It stores your website files. Sangkrit.net has hostings for everyone, from low budget offering limited resources to options that can handle very heavy traffic.

What hosting option you need depends on your budget. You are here for achieving success and for that you will certainly need a Dedicated Server at some point in time especially when your success starts. Having it beforehand can save you from issues that you will face while moving to a bigger hosting option everytime you require more RAM, more processing power and more database space because of sudden increase in traffic.

Still, if your budget is less, you may go for other hosting options based on your present time need. There are hosting options for everyone and this lesson will explain you how one differ from the other and what exactly you need as it is going to impact your website’s availability, and performance.

Cheapest Hosting Options

cPanel Starter is the cheapest hosting option that enables you to host one website. Cheapest doesn’t mean its worthless, it is good for hosting one website of any kind, the bandwidth is unmetered and storage is 30GB which is good as your first step online.

You can use it for hosting any dynamic website such as an eCommerce store or WordPress, Joomla or Magento etc.

cPanel Economy, this is second cheapest option. It lets you host one domain but gives you 10 MySQL databases, and 100 email accounts capacity. The core difference between cPanel Starter and cPanel Economy is that cPanel Starter gives you the power to host one website i.e. one domain having one database.

Whereas, cPanel Economy lets you host one domain but 10 MySQL databases which means you can create 10 websites on separate databases using a subdomain (example: sudomain.yourdomain.com) or subdirectory (yourdomain.com/subdirectory) option. You may create more websites using different table prefixes on one database. Well that you can do on cPanel Starter too if you want to host multiple subdomain or subdirectory sites on one database. But see the storage capacity of the database is limited.

cPanel Deluxe, lets you host unlimited websites which means you can add unlimited domains but the database limit is 25. That means you can either run 25 websites on 25 separate databases or host more websites (that’s what is unlimited) by using one database for multiple websites and you have 25 databases so you can run many websites here also. It lets you create 500 email accounts.

cPanel Ultimate enables you to add unlimited domains and lets you create unlimited databases. Gives you 1 year of free SSL subscription, more processing power, and 1000 email accounts that you can create on your own domain.

WordPress Hosting

Also called Managed WordPress, these hosting options lets you start your own website or online store in minutes.

They save you from the hassles of configuring and managing WordPress installations. They give you dashboard access with the power to start your website on your own without the need of hiring a web developer. They offer automatic setup, backups, and software updates paired with 24/7, online support.

The WordPress Hosting options include:

  1. WordPress Basic – Good for hosting one website with a capacity of handling 25,000 visitors a month
  2. WordPress Deluxe – One website with a capacity of handling 100,000 visitors a month
  3. WordPress Ultimate – One website with unlimited visits
  4. WordPress Ecommerce – Ideal for starting your own online shop i.e eCommerce website
  5. WordPress Developer – You can start and manage 5 different WordPress sites
  6. WordPress Pro – Lets you manage up to 25 different WordPress sites

Webhosting Plus

The Webhosting Plus offers you the simplicity of cPanel hosting with resources that you generally get on a server. It includes more dedicated resources than WordPress or cPanel hosting we discussed above.

This is a great option if you are hitting or going to hit massive traffic, you need more power and resources but at the same time, you don’t know how to manage a server and you don’t want to hire a system administrator.

It also includes multiple plans starting from 4GB RAM to 32GB RAM with the power of up to 16 CPUs:

  1. Webhosting Plus Launch – 4GB RAM with 2 CPUs
  2. Webhosting Plus Enhance – 8GB RAM with 4 CPUs
  3. Webhosting Plus Grow – 16GB RAM with 8 CPUs
  4. Webhosting Plus Expand – 32GB RAM with 16 CPUs

This hosting option is easier to manage just like other cPanel hostings.

VPS & Dedicated Servers

These give you complete control and no resources are shared with other users. A common hosting plan you purchase is located on a server running multiple hostings whereas on a dedicated server all resources are only for your use.

You can build multiple cPanel hostings, allocate resources to each hosting plan, you can decide how many domains each webhosting can have and how much server resources a website or hosting can utilize or you can simply allocate all server resources to your main website.

There various type of servers with higher-lower RAM and space options. But the subscription is of only two types: Self Managed and Fully Managed.

Self-Managed Servers: – These give you command line control. To manage this type of server you may either learn system engineering or hire a system administrator or you can simplify things for yourself by adding the cPanel WHM option.

Fully-Managed Servers: These servers come with round-the-clock dedicated online support from experts.

Subscribing a VPS or Dedicated Server is just like purchasing a computer machine. So while subscribing to a server what you should see is its RAM, storage option such as HDD or SSD, and processor.

Scheduling Sales On WordPress Ecommerce Websites

WordPress Ecommerce lets you start your own online store to begin selling your products online. You can start your eCommerce website, add your own products, price them, sell them online and collect payments via different payment gateways or simply use pay on delivery option.

It offers you many advanced features of selling, one useful feature is scheduling sales. In this lesson, you will learn about that and beyond the default scheduling feature that only lets you set the start and end date for any sale. You will see how you can extend the feature to not just schedule the sale date but also a time in hours and minutes.

How to schedule sales in WordPress Ecommerce?

The WordPress Ecommerce users at Sangkrit.net may simply log in to their eCommerce dashboard and follow these steps:

  1. Navigate to the ‘Products’ you would like to schedule sales or create a new product, whatever you need is
  2. Open it for editing if you are scheduling sales in an already listed product on your website
  3. In the ‘General’ section of the ‘Product data’ box click the ‘Schedule’ option
  4. Set your start and end date of product sale
  5. If you want to set a scheduling time too then install-activate a plugin called Precise Sales for WooCommerce
  6. Once the plugin is activated, you can also set sales time in hours and minutes in addition to the sales start and end day
Schedule Sales WordPress

This gives you a more precise way of scheduling sales, the plugin is especially helpful for stores that serve in countries having multiple timezones such as the United States.

Building Your Online Store On .SHOP Domain Name

.Shop is a generaic top level domain name that anyone can register to build his store online, it is well suitable for shop owners and people who want to sell online.

You can easily register it at Sangkrit.net with WordPress Ecommerce to build your online store yourself. With these two products you don’t need anybody or anything else except some time to setup your ecommerce store.

The WordPress Ecommerce at Sangkrit.net saves you from all hassles of installation and setup, you can directly login to dashboard and start managing your website.

How To Register .SHOP Domain Name With WordPress Ecommerce?

  1. Visit http://system.sangkrit.net
  2. Type the name you wish to register with .shop extension
  3. Click the select button next to the domain you wish to register
  4. Visit WordPress Ecommerce page
  5. Select WordPress Ecommerce plan
  6. Click Proceed to Cart button
  7. Checkout

Upon successful checkout, your products will be visible on your Sangkrit.net account’s products page. There you click the ‘Manage’ button next to Managed WordPress and it will let you connect your domain name with WordPress and login to your ecommerce website.

No Internet Promotion Is Complete Without A Website

The Internet has become the ultimate way of promoting anything worldwide or at a targetted location. 

If you are also thinking of using the Internet to promote your business then you must start by registering your domain name and making your website because no Internet marketing is complete without a website.

Unlike other offline ways of promotion, in addition to advertisement dialogs, the Internet additionally offers a clickable link that must direct your prospect to your website, and nowhere else because only your website can give you complete control over converting your prospects into customers.

Start by blogging your business

Exploring and examining campaigns can be an unnerving and long task for business owners, especially the ones who don’t want to keep a big team or staff. That is why we suggest you to simply start by blogging your business.

Because, with a blog, your possibilities become endless. A single blog post can do everything and give you everything which you otherwise get with paid promotions and costly marketing campaigns. 

For that, you simply need to your register domain name

Register your domain name, and then you can easily start your business website plus a blog with Managed WordPress, you can also use it for eCommerce i.e. online selling of your products. Moreover, you may combine it with an Email Marketing plan that now offers several enhancements to its digital marketing capabilities. Thus, making it easier and faster for small as well as big business owners who want to digitally connect with their prospects and customers.

With the new Email Marketing plan, you can very-very easily build a mailing list of your website visitors by prompting them to subscribe to your website. You can easily design effective and eye-catching content from the vast template library to suit their business needs. 

Once your marketing email has been built, you can then send it to all your subscribers, or to specific customers from your own list.

How To Make Your Online Store In Minutes?

Starting an online store with complete control and ownership has become so easy at SANGKRIT.net that you can also have a great eCommerce platform in minutes.

To start selling online, the best way is to make your own eCommerce store at SANGKRIT.net and enjoy complete freedom of doing business online without involving any third-party interference and share on your profit.

You can make your own smartphone-friendly eCommerce website live on the domain name in less than ten or fifteen minutes to start selling your products online and make your business operatable twenty-four-seven three sixty-five.

How To Start Selling Online?

If you want to go for the hosting option then simply register your domain name, subscribe cPanel hosting or a dedicated server, and then click the WordPress icon on cPanel to install it on your domain name. After WordPress is installed, simply install and activate the WooCommerce plugin.

Photo by cottonbro from Pexels

That’s it, your online store is ready.

WordPress Theme Installer Showing ‘Neve Theme’ Designs

And if you want to go for a bundled product then skip all the above-mentioned installation steps. Just register your domain name and subscribe to WordPress Ecommerce, to add your products and start selling.

You can do it for yourself (to bring your business online), you can do it for others (for a homemployment).

Every Store Owner Can Himself Make His Online Store

You can yourself build and manage your Ecommerce business. Every store owner in the world can easily set up his online store and start selling his products online. Anyone can do this simply by subscribing to WordPress Ecommerce.

The domain registration and other important tasks happen automatically when you subscribe to WordPress Ecommerce. Once you have subscribed it, you go ready to upload your products and tag them with your special price for an online sale.

Running an eCommerce business involves less money compared to selling anything in the same old way. By having an online store, you don’t have to invest money in purchasing business premises or worry about the business location. Here, the higher Managed WordPress plan you subscribe to, the better online location you own for your online business.

After You Subscribe WordPress Ecommerce

Once you are subscribed, log in to your website by visiting your SANGKRIT.net products page, then select the ‘Manage your site’ option under your WordPress Ecommerce plan.

Alternatively, you may also login by suffixing /wp-admin after your domain name but that will prompt you to enter your login user name and password whereas as you directly get access to your site admin panel from your SANGKRIT.net account.

Using your website’s admin panel you can sell anything online from your place.

WordPress Ecommerce is A Bundled Product

It is the fastest and easiest way to run an eCommerce business. It has been packed with all necessary online selling features that also include:

  • Automatic setup
  • Unlimited storage
  • Unlimited products
  • No transaction fees
  • One-click testing site
  • Real-time shipping rates
  • Unlimited visits per month
  • Automatic daily malware scans
  • Unlimited malware removal & hack repair
  • Search Engine Visibility with SEO optimizer
  • Automatic HTTPS SSL certificate installation
  • Website backup protection with 1-click restore
  • Option for bookings and appointment scheduling
  • Premium Ecommerce Storefront design themes made available for free
  • Free access to premium Ecommerce addon extensions that costs over $1,500 

The Design Of Your Website

To select a design for your website all you will need to do is search in your idea or industry in the theme installer and it will pull up a number of professionally designed, ready-to-launch themes for your website.

Then, select and activate the theme specific to your business niche.

Start Selling Your Products Online

You can add and customize products yourself, make pages, post articles to reach out to new prospects every day.

On the admin panel of your website, navigate to Products -> Add New page, enter your product’s title, intro, price, etc and click the ‘Publish’ button.

Similarly, for creating new pages visit Pages -> Add New, and for blogging your business (i.e. writing new posts) visit Posts – Add New page.

Managing Your Tax Details 

This is an optional feature coded especially for those who don’t use flat-rate on products. It is a section on your product edit screens that simply allows you to your enter tax details. You can make use of it if you are charging tax separately or ignore it if you use flat MRP over your products.

Business & Stock Management

You can manage your business activities, stocks, and workers remotely, you can implement from online appointment scheduling to a full-blown eCommerce system, WordPresss Ecommerce is powerful enough to handle your business’ needs today and as you grow.

This ecommerce system is not just limited to physical goods but you can sell anything such as online & offline services, downloadable products including files, images, digital books, even videos, etc. Everything is in here, simply start exploring your admin panel and you will learn new things everyday.

In case you face any problem, use the following comment form or if you are already a user then simply call the twenty-four-seven online support.

How To Make Shipments Trackable In Your WordPress Ecommerce Website?

To make product orders trackable by your customers on your WordPress Ecommerce website, you will need to add shipment tracking information into your store orders and then you can share that with your customers.

In order to do it on your online store simply login to your WordPress Ecommerce website and follow these steps:

  1. Navigate to WooCommerce -> Orders
  2. Find the order that you want to add tracking information to, and in the shipment tracking column, select ‘[+] Add shipment tracking’ option. As you click it, a modal box will appear
  3. Enter the shipment tracking number that your carrier has provided to you.
  4. Now the system will attempt to automatically provide you a tracking URL and carrier name
  5. If the automatic detection didn’t work, you can manually add a ‘Tracking URL’ and ‘Carrier Name’, and select ‘Next’
  6. Select which line items from the order will be included in this shipment.
  7. If desired, check the box to ‘Mark this order as complete’
  8. Select ‘Save shipment tracking’

Once the shipment tracking information is saved, you can view your tracking number, carrier, and the number of line items that are tracked. If a tracking URL was added, clicking on the tracking number will allow you to view the tracking information on your carrier’s site.

How To Add An Additional Tracking Number In WordPress Ecommerce?

If you’re shipping items from an order separately, you’ll have more than one tracking number to share with your customer. This article explains how to add additional tracking numbers to order in WordPress Ecommerce.

Login to your WordPress Ecommerce website and follow these steps:

  1. Navigate to WooCommerce > Orders
  2. Locate the order you want to add an additional tracking number to.
  3. You will see that the shipment tracking column is already populated with a tracking number
  4. Select ‘[+] Add shipment tracking’
  5. Enter the shipment tracking number that your carrier has provided to you.
  6. Now the system will attempt to automatically provide you a tracking URL and carrier name
  7. If the automatic detection didn’t work, you can manually add a ‘Tracking URL’ and ‘Carrier Name’, and select ‘Next’
  8. Select which line items from the order will be included in this shipment.
  9. If desired, check the box to ‘Mark this order as complete’
  10. Select ‘Save shipment tracking’

How To Modify Or Remove Tracking Number?

Once you’ve added a tracking number to a WooCommerce order, you can edit or remove it at any time. Simply log in to your WordPress Ecommerce website and follow these steps:

  1. Navigate to WooCommerce -> Orders
  2. Select the order you want to edit
  3. Scroll down to the Shipment Tracking section
  4. Select the pencil icon to edit the shipment information, or select the trash can icon to remove it from the order entirely

If the ‘Item Shipped’ email is enabled in your WooCommerce settings, your customers will receive a shipment email as you update shipment information for an order.

Let Your Customers Track The Shipment Of Their Order

When your customers buy anything from you via your online store, they start to await the shipment, they want to know when they can expect it to arrive.

WordPress Ecommerce now allows you to share product tracking information with your customers. Your customers automatically get an email anytime you add shipment information to their order.

The item shipped email info is enabled by default in your store settings. To manage these settings and check on the email you simply need to navigate to the ‘Ecommerce Settings’ page on your dashboard and select the option ‘Item Shipped Email’

On this settings page, you can edit the default email to add your own subject and content.

The default email settings are:

  • Default Subject: An item from {site_title} order {order_number} has shipped!
  • Default Heading: Your package is on the way!
  • Default Additional Content: Please note that it may take some time for the carrier to update shipment tracking information.

The email will then include a shipments table having the carrier name and the tracking number. The tracking number is formatted as a URL link only if you generate a tracking URL while adding tracking information to orders on your WordPress Ecommerce website.

You Can Use Multiple Domains On Your Managed WordPress Site

Managed WordPress offers you the easiest way to change your domain name or attach multiple domains on your website without worrying about the DNS settings.

If you have your domain name registered with SANGKRIT.net and you have a Managed WordPress or WordPress Ecommerce website, then all DNS changes will automatically take effect for your website.

  1. Log in to your SANGKRIT.net account
  2. Visit your products page and navigate to WordPress
  3. On the menu bar, select ‘Settings’
  4. In the ‘Domains’ section, select ‘Attach Domain’ option
  5. Using the ‘Choose a domain’ pull-down menu, select a domain from this account or you may also select ‘Add an external domain or subdomain’ to use a domain registered in another account or a subdomain will also work
  6. Your new domain name is attached
  7. Now, if you want to make it primary then simply go for the option ‘Make this the primary domain for your account’
  8. Select Attach and now your website will be live on the new domain and yes, your old domain name will also work

In case you don’t want to use a domain on your website then you can remove it. Suppose, after changing to a new primary domain, you can remove the old domain in case you don’t want to use it for your website. Else, you may continue using both. Whatever suits you the best.

Once you make any DNS changes, its propagation may take up to 24-48 hours for the changes to take effect. In most cases, if you have your domain name at SANGKRIT.net, many times it generally starts working in seconds. Still, 48 hours is the deadline.

How To Bulk Sell Products In WordPress Ecommerce Website?

You can sell bulk products in one product group by associating and linking multiple products at one price. The new WordPress WooCommerce plugin lets you to do this in a very easy way.

Simply start by installing-activating the new Bulk Product Selling plugin on your WordPress Ecommerce website. Once activated, visit the add new product page or open any old product for editing.

On the page, inside the product data section which is present below your product description section, you will see a new ‘Bulk Product’ tab is added. Click that tab and start typing the name of the product you want to link, once the product name is displayed, click it and it will be added.

Following this way you can link as many products as you want. Once you are finished adding your products in the bulk products section. Simply update or publish your product.

That’s it. Visit the front end of your website to see it working. The plugin works for simple, variable, and other types of products of your eCommerce website. If you yet don’t have a website, you can easily create one yourself with Managed WordPress.

How To Enable PreOrdering In Your WordPress Ecommerce Store?

You can allow your customers to pre-order upcoming products from your WordPress Ecommerce website. This way you can enable the selling of the product before they become available in your inventory.

Pre Order for WooCommerce plugin lets you do this very easily on your online store. To start you should have a WordPress Ecommerce website, if you don’t have one, you can easily make it at SANGKRIT.net by registering or transferring your domain and then subscribing to WordPress Ecommerce.

Next, install-activate the new WordPress plugin called Pre Order for WooCommerce. Upon activation, the plugin will add two new fields in the inventory tab present under the ‘Product Data’ section of your product admin screen, as shown in the above-given screenshot.

The two fields are:

  1. Pre Order Product – The checkbox option allows you to enable pre-ordering on selected products
  2. Pre Order Date – The field allows you to set a product shipping date on the pre-order enabled product

Once you enter the correct information in these two fields, enter order important product information such as price, name, variations etc and then publish or update your product.

That’s it. The product’s default ‘Buy Now’ button will now get changed to the ‘Preorder Now’ button allowing your customers to pre-order that specific product from your website.

How To Allow Subscription On Products In WordPress Ecommerce?

You can allow your users to subscribe to products they need on regular basis. The desired duration on applicable products can be set by you. The duration of the subscription can be set in months and calculated from the present day or it can be added to an active subscription.

To start simply install-activate the new WordPress plugin called Monthly Subscription. Next, from the admin panel of your WordPress Ecommerce website:

  1. Create a new product
  2. Enter the product name, price, and other information
  3. Now select ‘Monthly Subscription’ as a product type
  4. You can add the ‘Subscription Duration’ on the input field (below the price under the ‘General’ tab of ‘Product Information’)
  5. Finally, save and publish your product

That’s for products. You can also use the plugin with your content via shortcode. Here you simply need to enclose selective content within the opening and closing shortcode (provided by the plugin) and only the users having an active subscription would be able to see that text.

Drop Or Raise Product Price Dynamically In WordPress Ecommerce

On your WordPress Ecommerce website, you can dynamically increase or decrease product pricing by a set timeframe to entice more buyers.

For example, You may set a 7% automatic decrease in the price of any product and make it work for a set interval of time to attract buyers and make them busy on your website. This way they would also spend more time on your website waiting for the lowest price that they are willing to pay. 

How To Make It Work On Your Website?

Simply log in to your WordPress Ecommerce website and install-activate this new WooCommerce plugin called Drop / Raise Price for WooCommerce.

Now visit Products -> Add New page or open any old product for editing.

In the Product Data tab, you will see the General tab having new inputs fields for Price decrement, Minimal price, Drop price every ‘n’ minutes, Counter checkbox and Drop Price Timeframe, as shown in the above-given screenshot.

Enter your values then update or publish your product. That’s it.

How To Take Your Business Online?

More and more people are searching Google and more people are buying things online and this is happening everywhere. If you are yet not online then you are missing this audience. This will not end here, consumer behavior is continuously upgrading worldwide. Inherently, very soon your consumers would also adopt this behavior.

Hence, it is important for you to start serving your customers online. The lesson guides you on how you can bring your business online easily on your own:

  1. Start by registering your domain name
  2. Make your website with Managed WordPress
  3. Use the eCommerce option to sell your products and services online
  4. Know your customers and reach them by blogging your business

Everything online starts with a domain name so register it first. Next, you will need Managed WordPress to make your website yourself. No, you don’t need any expert to make your website but Managed WordPress. You simply need to subscribe to Managed WordPress or WordPress Ecommerce as per the requirement of your business and once you do that its admin panel will let you –

  1. Write new posts
  2. Create and manage pages
  3. Interact with your customers
  4. Add products to start selling online
  5. Change the look and feel of your website
  6. Add new features with plugins & addons
  7. Manage everything on your own 

As a businessman, you should see the benefits and opportunities that the Internet is offering. Online presence offers convenience to customers. It allows them to explore your products or services, make purchases, or access information about your business at any time from the comfort of their own homes or on the go. And more convenience to customers with a better experience of purchase bring more business.

How To Get Your Business Visible On Internet Search?

Simply start blogging your business, learn and improve, stay consistent, and don’t drop your frequency until you reach the first page of the search results page.

Start Your Blog

Every sale starts with an internet search and every internet search displays posts from other blogs. So first of all you need to create your own blog.

That can be easily done by registering your domain name and making your website yourself with WordPress.

You may simply subscribe to Managed WordPress, WordPress Ecommerce, or use a Dedicated Server as per your budget. 

Start Blogging Your Business

Once you make your website, start posting articles about your business. Write compelling post titles to target your consumer and create more posts every day. Each blog post is an opportunity to get visible on search and rank higher than before. 

Make Your Website Load Fast

If your website performs slow, ninety percent of the visitors are going to leave your website in a second. If you want to avoid such a situation then keep your website fast. Otherwise, you will also make it difficult for the search engines to archive your website.

To speed up your website you can 

  • Use fewer plugins
  • Use lightweight themes
  • Use WP Super Cache plugin
  • Set up a lazy load image plugin
  • Stick only to WordPress default themes
  • Ensure that the images are not too heavy

Searchers Come To You For A Solution

People click your post for a solution, not to see the beauty of your website. So always serve them with high-quality content. Find out what your searchers want and give that to them.

Focus on writing posts that can promote your business by helping others. You can write posts about your products, how they are useful to consumers, how to use them, why people should choose you, etc. 

Write easy-to-read and follow text and before you write a post title always think about the words that a searcher might search to find your post.

You Don’t Need Any SEO Expert

Posting high-quality content consistently is enough to get your website visible on search.

Don’t get into the trap of SEO experts or you will end up wasting your time and money. That can be better utilized in making great posts and promoting your domain.

You can simply subscribe to search engine visibility to be well on your way to an optimized website. It will help you to increase your search rankings with its suggested topic tool. It also lets you track your internet ranking, analyze your website and know its performance.