

This tutorial is about creating a powerful and useful social networking website for business, family or whatever. You can easily create one in minutes if you a have a WordPress website. BuddyPress is a free plugin which transforms your WordPress installation in to a social network with powerful social networking features like Extended User Profiles, Activity Streams, Member Account Settings, Friend Connections, Internal Private Messaging, User Groups, Notifications, Site Tracking and there are thousands of good BuddyPress plugins available to extend your networking options & features.
[heading size=”17″]Before Creating A Social Network[/heading]
To start you must have a self-hosted WordPress site. If you don’t have a WordPress site then create one by purchasing our WordPress hosting and using one click WordPress install, it takes only a few minutes. After WordPress is installed, login to your admin area (yourdomain.com/wp-admin) and follow the given steps.
[heading size=”17″]Step-1 Installing BuddyPress[/heading]
Visit admin area Dashboard -> Plugins -> Add New page and search for BuddyPress. Now install and activate BuddyPress plugin, upon activation you will be directed to BuddyPress welcome page.

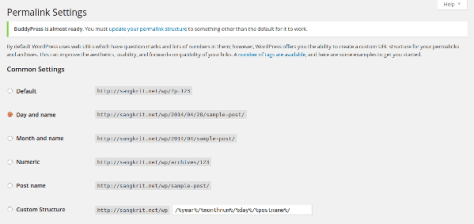
[heading size=”17″]Step-2 Change Permalinks For BuddyPress To Work[/heading]
Soon after activation BuddyPress asks you to update your permalink structure to something other than the default for it to work. So Visit Dashboard -> Settings -> Permalinks page and choose some other permalink structure.
[heading size=”17″]Step-3 Enable/Disable BuddyPress Components[/heading]
BuddyPress provides you a group of features you can enable or disable from Dashboard -> Settings -> BuddyPress under the components tab. On this page you can enable components like friend connection, private messaging and user groups etc.

[heading size=”17″]Step-4 Assign Registration & Account Activation Pages[/heading]
BuddyPress uses WordPress pages for displaying components data. For example: Members page displays the list of members, activity page displays sitewide activity stream. If you are keeping website registration open or using invite anyone plugin then you will be needing to create and assign a page for registration & account activation from Dashboard -> Settings -> BuddyPress, under the ‘Pages‘ tab.

‘Settings‘ tab provides you some optional settings like you can enable/disable toolbar for logged out users, you can allow registered members to delete their own account, upload avatars, you can enable or disable group creation for registered users etc.

[heading size=”17″]Step-5 Your Social Network Is Ready[/heading]
That’s all. Your social networking website is ready, if you have any problems then use the following comment form or take a look over to BuddyPress Documentation.

You can add new users from Users -> Add New page or use Invite Anyone plugin or open registration for everyone from Dashboard -> Settings -> General page by ticking ‘Anyone can register‘ checkbox.
You can extend your network and add more features by adding new BuddyPress plugin. For adding BuddyPress addon plugins, visit Dashboard -> Plugins -> Add New page and search for BuddyPress keyword or click BuddyPress from the given tag cloud.
You may also use Commons in a Box plugin which provides you set of some useful BuddyPress plugins, all in one. Also read our tutorial about Quick And Easy Way Of Installing BuddyPress Plugins From WordPress Admin Area.