Cookie Manager is a chrome extension made to protect your online privacy by managing your browser cookies with more control. You can add, edit and delete cookies from its toolbar. Also you can search cookies if there are many etc.
You must have observed this feature on Facebook. Facebook Poke is an old feature of Facebook. Now you can enable Poke in your BuddyPress site too. BuddyPress Poke is the new plugin by Anu Sharma. The plugin simply activates Poke in BuddyPress that enables your community members to poke other members, just like Facebook.
Other user profile
Poke screen
Error message
Poke back screen
Simply install and activate the plugin. Upon activate your logged in members will be able to poke by visiting other users profile and using poke button.
Quick Navigation provides you new fast and easy way of admin section post navigation. There many ways of editing your blog posts by generally bloggers use Dashboard -> Posts -> All Posts page. Now what this new plugin does is it add a filter on ‘All posts’ list admin page and you can open any post for editing by using this dropdown showing all post on that admin page list.
Second thing Quick Navigation does is it also adds a dropdown box is edit post page from where you can directly open any post for editing soon after editing or publishing content.
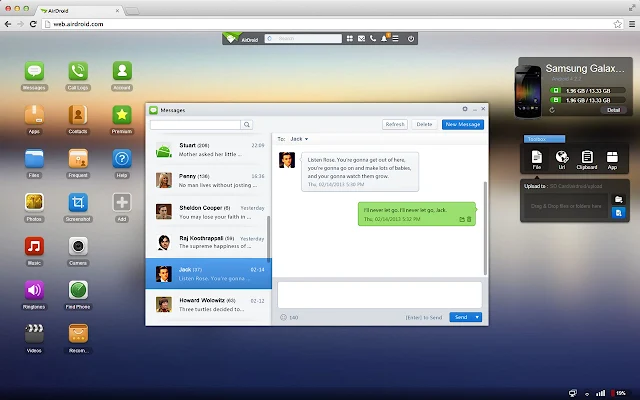
AirDroid is a powerful but free cloud app that allows you to manage all your Android devices right from a web browser, your chromebook, from anywhere, from any web browser, all over the air. The application provides you complete control over your Android devices and best part is Desktop SMS that lest you easily Send & receive SMS right from your computer, you can type SMS using your keyboard giving your complete comfort with faster typing and navigation with the full keyboard and large screen.
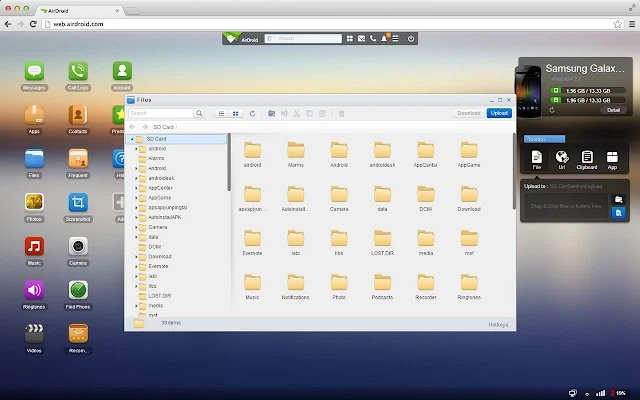
Other features allows you to manage Files and Media. You can move photos, videos, ringtones and any other files on and off Android, all without a USB cable.
You can manage your Phone Calls, Clipboard , URL transfer. Make Calls, Contact, Share Clipboard Content across devices, push URL to Android and there are more features awaiting for you to discover them.
How to use AirDroid to manage all your Android devices from a web browser?
Step-1 First thing you need to do is visit http://web.airdroid.com/ and sign up your account. You may signup using your Facebook, Google etc accounts too. After you signup you will see a Android Home like desktop showing up in your web browser window.
Step-2 Now you may connect your Android devices. Install AirDroid App from Google Play, click sign-in button and login with the same account and your device will be connected.
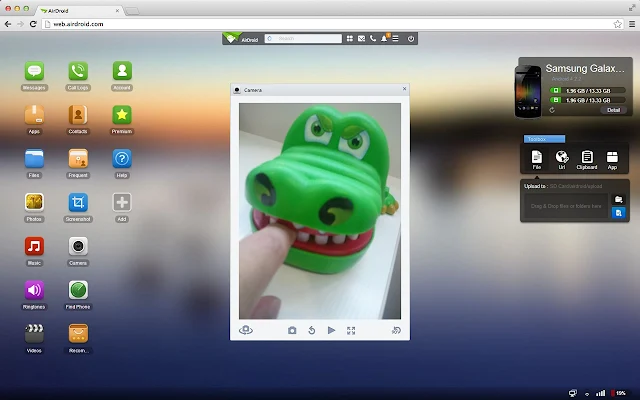
You can Manage your Android Apps, gets to easy app search, installation and apk export. You can see through the lens of your Android camera, front and back. Or stream the screen of your Android in nearly real-time.
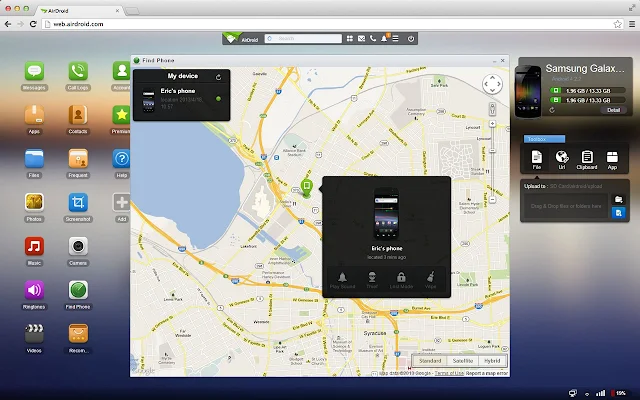
Not only this much but even you can find the location of your phone. Yes you can locate and lock your Android from any browser in-case if it’s lost. Also you can wipe all its data remotely.
You can turn any simple WordPress page into a Resume Page by using the new easy WordPress plugin called Resume Page. The plugin provides you all inbuilt basics for all what a resume page needs. The plugin follows traditional resume layout and is completely customizable with in-built design options and also you can add your custom CSS.
It provides you power to turn any page of your website into a different resume page. It also has a smart templating feature that enables developers to easily override the template simply by dropping it into child theme.
Resume Page with stacked corners.
Resume page with flat view and background image
Github and Portfolio integration
How to use Resume Page Plugin?
Install and activate Resume Page. Upon activation the plugin automatically adds various metaboxes in Add New/Edit Pages. For creating a new resume page all you have to do is create a new page from Dashboard -> Pages -> Add New and tick ‘Make this page a Resume Page’ option in Resume Page metabox, you can also select your resume page theme, layout and manage its sections right from the page admin section.
Archiver for Gmail is a script for Google Chrome. It seamlessly analyze your Gmail inbox and moves all of the big attachments to your Google drive, you can do it in one click. It also provides you background features for automatically copying email attachments to Google Drive.
Script is easy to use. Simply install its extension (Archiver for Gmail) in your Chrome then follow the steps:
Visit your Chrome Apps page and launch Archiver for Gmail
First it will ask for authorization, complete app authorization by following on screen steps
After completing authorization you will be seeing this scripts main page, simply click the ‘Start‘ button to begin the process.
Now it will automatically copy all your big email attachments (1 MB or bigger) to Google Drive and label your incoming emails based on the attachment size.
The script also saves a HTML copy of the whole email thread and makes you free to delete each email containing big attachments (this can be even done automatically). All messages containing relevant attachments will be labelled, so that you can index your inbox even better.
If you like writing long articles with multiple headings, ONet Auto Headline Anchor will allows you to add a link next to your headings so that your readers can easily share posts pointing to specific parts, you might have noticed this feature in GitHub and on some websites running on Mediawiki. The feature is also loaded with a smooth scroll script.
Upon activation visit your admin area Dashboard -> Settings -> Reading
Scroll down to ONet Auto Headline Anchor settings section and select your settings
It allows you to set the options like Enable parse, Choose Linkify style, Linkify style, Smooth scroll, Use cache, Select Tags to parse from H1 to H6, Add support for posts & pages
Also you can get a TOC of content by using ONetAutoHeadlineAnchor::get_toc([content],[optional: return hierarchical or raw list]).
The plugin contains a predefined style for Git-like link display but it is hardly recommend to change the style to fit your needs (and your design).
You can improve your WordPress site pagination by adding enabling extra input number that simply allows users to jump to any (x) page. There are various pagination plugins that changes default ‘Older Posts’ & ‘Newer Posts’ option to page number, now this tutorial explains you to add one extra function that enables users to jump to some page number directly.
You can fetch yours or someone else’s YouTube video (uploads or favorites) from YouTube channels to create beautiful albums with retrieved info into your WordPress site. Srizon Responsive Youtube Album is the new WordPress plugin by srizon.com. Using this new plugin you can create video albums, the play video on a responsive lightbox, you can add as many albums as you want and display them using shortcodes which are generated automatically, you can copy/paste them into your blog post, page or any other custom post type etc.
Install and activate Srizon Responsive Youtube Album. Upon activation the plugin adds a new menu ‘YouTube Album’ in WordPress admin area. Follow the given steps:
From Dashboard -> YouTube Albums menu click on the Albums submenu
Click “Add New” button to add a new album. (or click on an existing album title to edit that)
Fill-up or modify the form and save that
Your albums will be listed along with the shortcodes. Use the shortcodes into your page/post to show the video album
Try out different options to suit your need
Thumb with description layout – wide view Thumb Grid layout – wide view Video in responsive lightbox – wide view Video in responsive lightbox – small screen Thumb Grid layout – small screen Admin View – Adding album – basic Admin View – Adding album – layout related options
Admin View – Album list with shortcodes
FavHero – Favicon Generator is a quick one-click favicon generator for WordPress sites. With this new plugin you can instantly in just one click generate favion from any image you have in your WordPress media library. Install and activate FavHero – Favicon Generator plugin, after activation visit your admin area Dashboard -> Settings -> FavHero Favicons page, click ‘Select Faviocn‘ button to select an image from your media library to make it your website’s favicon. Also you can upload any image from your local hardrive and make it your site’s favicon.
Jetpack is a popular WordPress plugin that provides you a package of various cool features designed by WordPress.Com. This tutorial is on new WordPress plugin that installs only sharing module of Jetpack into your WordPress site. Useful for the users interested in only sharing feature of Jetpack, now there is no need of installing whole package.
Jetpack Sharing is the new WordPress plugin by Anas H. Sulaiman. The plugin contains Jetpack’s sharing module and activates it in your WordPress site. Simply install and activate it the visit your admin area Dashboard -> Settings -> Sharing page and set the options.
Features: All what you get in Official Jetpack’s Sharing Module:
Choose social networks buttons you’d like to add.
Drag and drop style for button selection.
Hide some buttons behind a share button.
Add your own custom buttons.
Choose from 4 different buttons styles: icon only, text only, icon + text, or official buttons.
Custom sharing label. (displayed next to sharing buttons)
Open links in the same window, or in a new one.
Choose where the buttons show up.
Preview how the buttons will be appear on your website, right from the settings page.
You can disable your website comments by referers which means you can ban visitors from some websites from viewing or adding comments to your website’s posts, pages etc.
How to disable comments by referer?
Disable Comments By Referer is the new WordPress plugin that lets you selectively disable comments for visitors coming from certain websites (e.g. reddit).
Install and activate the plugin then follow the given steps:
Upon activation visit your admin area Dashboard -> Settings -> Discussion page
Scroll down to ‘Referer Blacklist for Comments’ section (added at the very bottom of the page).
Type the a comma-separated bare hostnames, (ex: www.reddit.com, news.ycombinator.com.) in the given text area as shown in following given screenshot:
That’s all. Save your settings and you are done. How it works?
If a visitor’s HTTP referer matches to one of the hosts you’ve blacklisted then the your post will look like as comments have been disabled on your website, neither existing comments nor the new comment form is displayed.
The Newswire is the brand new WordPress theme by wpdevshed.com with beautiful and clean design. Great for personal weblogs and simple news sites. It provides you two customizable menus and you can also add banner code to the header and sidebar from the customize menu.
Theme also has a huge home page slider for showing your latest blog posts (or sticky posts if you like). You can up;oad your own logo from its admin section customize options page. Other than this you can change fonts, colors and background without any custom CSS coding etc.
You can very easily show or hide on your WordPress site post, page or any other custom post type etc on per post basis. You can decide on what post/page you like to show title and on what post/page you like to hide. This way you can hide selected post/page titles on single pages. Hide Title is a handy WordPress plugin that allows you to do so. [Also read: Hiding Selective Widgets Title]
So first install and activate Hide Title plugin. Upon activation the plugin automatically adds Hide Title meta box on edit content page. Now what you have to do is tick the checkbox for showing/hiding title in single i.e. pages.
Title on archive pages show as it is but when the title is clicked and single page is opened, the title goes off itself. The plugin doesn’t disturbs your old posts, pages etc. By default ‘Hide the title on singular page views’ option is unchecked.
By default most WordPress themes uses same style for all sidebar and other widget areas. This tutorial is on how you can make selected widgets on your website look differently in some custom style given by you.
First of all install and activate the WordPress plugin called Widget CSS Classes. This is a well known WP plugin that allows you to add custom classes and ids plus first, last, even, odd, and numbered classes to your widgets. Not only this much but it also adds some additional classes to help you style your widgets more easily:
widget-first: added to the first widget in a sidebar
widget-last: added to the last widget in a sidebar
widget-odd: added to odd numbered widgets in a sidebar
widget-even: added to even numbered widgets in a sidebar
widget-#: added to every widget, such as widget-1, widget-2
After activation visit your admin area Dashboard -> Appearance -> Widgets page and you will see a new CSS class field is added under each widget. Now all you have to do is write custom CSS and add its class to individual widgets.
Screenshot showing basic widget after the plugin is activated:
Screenshot showing widget with ID field and Dropdown option enabled:
Widget Options & Features:
There are some more options this widgets provides you (Settings -> Widget CSS Classes) like you can enable Widget Number Classes, First/Last Classes, Even/Odd Classes, Show Additional Field for ID, Class Field Type Text Dropdown Hide etc. Also you can define Classes for Dropdown from the options page.
Features:
Adds a text field to a widget for defining a class
You can specify multiple classes by putting a space between them
Optionally adds a dropdown menu with predefined classes instead of a text field
Optionally adds a text field to add an id to a widget
Adds first and last classes to the first and last widget instances in a sidebar
Adds even/odd classes to widgets
Adds number classes to widgets
Fully translatable
Multi-site compatible
Compatible with Widget Logic and Widget Context plugins
Has filters and hooks for customizing output including class names
You can easily, in just one click add a search box in your WordPress site’s main navigation menu bar. Search box on Navigation Menu lets you do this in a very easy way. All will be needing to do is install and activate it.
Upon activation the plugin adds the default search box on main navigation menu that will save the space and flexibly fit with the menu.
Sliding Contact Form By FormGet is is a powerful form builder tool with lots of form building features. Using this new plugin you can capture your site visitors information, you can build unlimited contact forms in some seconds. It provides you a beautiful AJAX powered contact form builder with drag and drop interface.
The plugin is easy to use. Simply install and activate Sliding Contact Form By FormGet. After activation visit your admin area Dashboard -> Contact Form page and from there you can start creating your contact forms. Its admin area interface is intuitive & easy. Contact Us button can be set in at any of the given direction(left, right or bottom) you set, you can show it on every page on your website or you can display form on individually on pages, post, widgets and sidebar.
The good thing about this new contact form plugin is that it flawlessly redeems FormGet to your website, now no more swapping between your website to edit contact forms, you can view submission and copy code. It lets you manage your FormGet account from your wordpress dashboard, so can take advantage of all FormGet great feature without leaving your editor.
You must have observed this type of feature on many websites. By default, WordPress allows you to select taxonomy terms one by one, even if you select any parent taxonomy, you have to select other child taxonomy terms one by one. This is good for most WordPress users but sometimes you need more options.
Now you can add a fast and responsive launcher bar similar to application launcher buttons in various operating systems. WP Start bar automatically add a Windows like launcher bar with a start button you can use for visiting various sections of your website. This way you can control your website just like you control your operating system.
Now you can easily set up Chrome to fetch and show you the news on topics you like. There is no need to visit Google News and click same Filters every time when you can read them in just one click right from your Chrome’s home.
Follow the given steps:
Step-1 First thing you need to do is visit Google Web Store and add News You Like app in your Chromebook or on simple Chrome web-browser.
Step-2 As soon it installs, you will see its icon on your Apps page and also on your desktop app launcher (if you are using it). Click the icon and it will redirect you to a news on various topics with tabs as filters. By default it shows you news on some predefined topics including your country, Google and Chrome etc. NEXT step is to add your favourite news topics.
Step-3 Click the ‘Settings’ button, you will see a lightbox over lay with various text fields. Now type names of news categories you like and click the ‘Save’ button.
That’s all. Now you can read your favourite news anytime by clicking News you like icon from the apps page or directly from your desktop app launcher.
Skype uses decentralized peer-to-peer technologies and lets you make calls without letting anything go through a central server, but through distributed servers and other users. It is proprietary software you may use for making calls over the Internet using your computer. The Skype software is free to use, but it is not free software. It is free as a beer, its source code is not available for modification.


 Other user profile
 Poke screen
 Error message
 Poke back screen


 Thumb with description layout – wide view
 Thumb Grid layout – wide view
 Video in responsive lightbox – wide view
 Video in responsive lightbox – small screen
 Thumb Grid layout – small screen
 Admin View – Adding album – basic
 Admin View – Adding album – layout related options


