

Icon List is the new WordPress widget plugin that cab be used for various purposes like professionally displaying address & contact information or for showing your website’s social media information. It provides you a flexible widget for displaying a standard list with cool icons.
Continue reading New Multipurpose Icon List Widget For WordPress
New Multipurpose Icon List Widget For WordPress

How To Enable Noindex Meta Tag In WordPress Attachment Pages?
WordPress automatically creates an attachment page for every media file uploaded to its media library. Some themes provides you feature to enable and disable search engine indexing for attachment pages. Other than this popular SEO plugin by Yoast also allows you to disable indexing for attachment pages and you can redirect them all to their parent post URLs.
Continue reading How To Enable Noindex Meta Tag In WordPress Attachment Pages?

Record And Upload Videos Directly From WordPress To YouTube
Mostly webmasters don’t like uploading videos on their server, there are many reasons. In general, bloggers upload their tutorial or other kinds of videos first to YouTube and then they embed them on their website, blog posts etc. Now this tutorial is going to make your work easy. Now by using new WordPress plugin you can record and upload videos directly from your WordPress site to your YouTube account.
Continue reading Record And Upload Videos Directly From WordPress To YouTube

Easily Screencast Anything On Linux With New Simple Screen Recorder App
Simple Screen Recorder is an easy user friendly program you can use for making demos, tutorials, or recording videos or games. You can use this program to record your screen, you can set a custom record size, you can record a specific section, you can use the mouse and follow the cursor, you can scale video, include microphone etc.
Continue reading Easily Screencast Anything On Linux With New Simple Screen Recorder App

How To Create Animated GIFs From YouTube Videos?
You must have seen animated various kinds of animated GIFs on social networking sites. Linux news websites use them for showing why everyone loves to hate Ubuntu Unity interface, Health and Fitness websites use them for showing exercise moves etc etc. Now you can also create GIFs from any YouTube video or if you like making GIF from a video you have then you can upload it to YouTube first and then make its GIF image file.
Continue reading How To Create Animated GIFs From YouTube Videos?

How To Enable Live Preview For Links In WordPress?
Just like Facebook and Google+, you can enable live preview feature for links in WordPress. WP Live Preview Links is the new WordPress plugin that enables a live scaled preview of website you are linking to prior to clicking on it. The preview goes of as soon the user stop hovering the link. See it live working here.
Continue reading How To Enable Live Preview For Links In WordPress?

5 Websites Providing Free Resources For Web Designers
Open Source Web Design (OSWD): The website provides web designers a collection of various web designs submitted by community members. It provides free web design downloads which you can use for styling personal websites, blogs or a fully featured CMS for businesses.
40 Professional Icon Sets: A collection of 40 high-quality professional designed icons for desktops and web designing purposes, all icons are free for download and can be used both for private and commercial purposes.
1000+ Classic Icons: Free online collection of free icons available online. Icons are in png, icns, ico-formats as well as .EPS vector files.
Free CSS Templates: The website contains standards compliant CSS templates for free. You are free to use the templates both for personal or commercial purposes.
Free Icons Web: Provides you resource of 15000 high quality icons and all are free downloads. It provides icons for Windows XP, Vista, Macintosh, and Linux. But here the icons are for personal use only. For using their stuff commercially, you will have to pay a certain amount of royalty.
Iconspedia: The website provides free icons download of various categories like animals, food and phones etc.

How To List Last Changes Made To Your WordPress Site?
List Last Changes, a simple lightweight WordPress widget plugin that simply displays a list of the last changes (with date) made in your website on your sidebar or any other widget area your theme provides.
Continue reading How To List Last Changes Made To Your WordPress Site?

IG PageBuilder For Designing A New WordPress Site In Minutes
IG PageBuilder provides you a user friendly way to build a complete WordPress site in a few minutes. By default WordPress provides you with Visual and Text Editor present in Add New/Edit content pages. Now this new plugin adds a new Page Builder Tab in default WordPress visual editor and it is accessible for all pages, posts, even on custom post types. Using this new Page Builder tab you can design stylish pages with convenient drag and drop functionality and its intuitive interface which is simple and extremely easy to use.
Continue reading IG PageBuilder For Designing A New WordPress Site In Minutes
Shardul Pandey Talks To Morgen Stiegler

Shardul Pandey: I welcome you Morgen at SANGKRIT.net, please tell our netizens
Morgen Stiegler: I’m a professional Jazz, Pop and Rock singer from Ohio. From a young age, I loved jazz. My grandfather was a swing clarinet player. My first exposure to jazz was to hear him play and to see how much passion and love he had for the music. I never thought that I would be a jazz singer, or even a singer at all. It was not until a few things happened on my journey that I realized this was my calling. The first was a call from Kim Nazarian of the New York Voices. She remembered hearing me sing in college and asked me to open for her at a small show. I felt so honored. I did it, and then I studied with her for a few years. She helped me to grow so much as a singer and a person. In 2011 I released my first album, Reaching for the Moon. My career started to gain speed, and as it did I became very interested in recreating the 1940s and 50s in my performance through fashion. At first, this was just a passion of mine, but this year the British fashion magazine Vintage Life wrote a review of my album and featured me and my performance style in their July issue. I am working on a second jazz album, and have also launched a retro rock band called The Pinup Project which is really taking off.
 Shardul Pandey: What makes your endeavors unique ?
Morgen Stiegler: I am not only a one faceted performer, but perform across many genres with one unique image. I live out 1940s and 50s fashion and aesthetics on stage, but do so as a jazz musician and through my various projects. One such project is my retro rock band, called The Pinup Project. We reinvent rock and roll from all genres from a jazz perspective with a rockabilly image. Another project I have is a free improvisation group that reinvents Kurt Weill songs. This is more of an art music/new music setting. I strive to be genuine in how I present myself and use clothing, hair and aesthetics as a way to express myself and to connect with my audience. I was recently featured in Vintage Life magazine because of this mission.
Shardul Pandey: On what musical projects you are currently working one? What can we expect from you in the next few years ? Any long term goals?
Morgen Stiegler: I am in the studio now creating a “straight ahead” jazz album with Gene and Ray Parker, a father son team who have played with some of the greats in jazz. This album will be intimate, focusing on all jazz standards and featuring Ray Parker on upright bass and Gene Parker on vibraphone. We may also release a Christmas EP next year. I am also planning to get into the studio with my rock group The Pinup Project.
Shardul Pandey: What is your foremost experience as an artist ? Any favorite moment you would like to share?
Morgen Stiegler: There are many moments that stick out in my mind, but most valuable to me are small moments of connection with my audience. Hearing from an audience member that the song I sang was exactly what they needed to hear warms my heart so much. I view a vocalist’s role as being a vessel of the lyrics.. it gives us a supreme purpose to be there. Telling a story allows us not only to transport ourselves but to connect with others that may be walking the same journey.
Shardul Pandey: Any other creative mediums you work in?
Morgen Stiegler: I teach ethnomusicology, which focuses on studying the musics of the world. I have been known to draw, paint, and create visual art, but my preferred form is and always has been music. I truly believe it is a window to the soul.

Shardul Pandey: How do you best describe what music is to you?
Morgen Stiegler: Music is a means of expression, an outlet for frustration and elation, and a way to connect with other members of this human race. We are all so different, but there are many basic needs and desires that make us very much the same. Some of them are the desires to be loved, understood, and heard. Most importantly I think, is this need to be connected to others. Music is a direct way to achieve this connection… Regardless of race, ethnicity, religion, political views, etc… we have all experienced heart-break. We all know what it’s like to feel down and out, and we all crave happiness and acceptance. Music taps on this raw nerve in us, and brings out the best, the worst, the saddest, and the happiest parts of who we are. It is truly a beautiful thing that helps us to adapt, grow, accept, and move on.
Shardul Pandey: Who were your biggest musical influences ?
Morgen Stiegler: My grandfather was my biggest musical influence. He was a jazz clarinet player. Famous influences include artists from many genres that have in common one thing – to connect to the audience and touch lives. Some of them are Louis Armstrong, Carmen McCrae, Ella Fitzgerald, Holly Cole, Tori Amos, Kimbra, Sting, Eva Cassidy, New York Voices, and many more.
Shardul Pandey: What songs get you moving ?
Morgen Stiegler: Groove is my one guilty pleasure.. I will move to anything with a great sense of groove. I love so many types of music styles that achieve this – rockabilly, rock and roll, hip hop, country, r&b.. it all comes down to the connection factor.
 Shardul Pandey: Any plans for an international tour on your skyline?
Morgen Stiegler: I have lots of plans in my mind… of course an international tour would be great!
Shardul Pandey: What you feel is your strength as a musician and how would you like to be remembered ?
Morgen Stiegler: My strength as a musician (I hope that I achieve) is creating a genuine connection with my audience. I love connecting with new people from all over the world – people I may not meet in any other place, but I have the privilege of being with them at a show or sharing music with them. I hope that I am successful at this goal, and that I am remembered as someone who makes music for the sheer passion and love for making it, and I hope to touch some hearts along the way.
Shardul Pandey: What advice would you give to newbie musicians?
Morgen Stiegler: Have PASSION! This world is not always an easy place to live, but passion can drive you to places you never thought you could go. Passion also makes life so much more positive and enjoyable.
Shardul Pandey: What is your web address, do you own a domain ? Where netizens can find latest news feed about you and your music ?
Morgen Stiegler: I own a domain Morgenstiegler.com and also a new website coming in this month for my new retro rock and roll group, called The Pinup Project. I also have a Facebook page: Facebook.com/MorgenL.Stiegler. The Facebook page for The Pinup Project is launching soon and the address will be: Facebook.com/thepinupproject.
Shardul Pandey: What is your ultimate message for netizens ?
Morgen Stiegler: No matter what you do, what is happening in your life, or where you are on your journey… always remember you are not alone. Find your passions in the small things, and live big dreams by doing this.

Slax OS: Fast, Lightweight, Portable Pocket Linux In Modern KDE Interface & Outstanding Design
Slax is a fast, modern, lightweight, live boot free operating system with a modular approach and outstanding layout and style. It is small in size but still it provides you a wide range of pre-installed software useful for everyday use. It includes a well organized GUI (Graphical user interface) and recovery tools. Other than this it also provides you various modules you can download if you are missing any specific feature. For Example: If any networking tool or game is missing you can download its module with the software and copy it to your Slax OS without running any installation or setting up any configuration settings.

How To Use Your Ubuntu Laptop As A WiFi Router (Hotspot)?
A few easy steps (no software installation is required) can turn your Ubuntu Laptop in to a Wireless Router and you can share your Internet connection with other users using other devices may be Netbook, Tablet or Laptop etc. You can do this thing visually right from the Ubuntu GUI (Graphical User Interface) but there are some limitations like for some devices. There are some devices that may not support ad-hoc wireless networks and Ubuntu can only create wireless hotspots using weak WEP encryption instead of strong WPA encryption.
Continue reading How To Use Your Ubuntu Laptop As A WiFi Router (Hotspot)?

How To Burn Any ISO File To CD/DVD On Ubuntu?
Insert blank CD/DVD into your burner. A ‘CD/DVD Creator’, ‘Choose Disc Type’ or ‘Blank Disc’ window might pop up. Close it.

Now look up for the downloaded ISO file in the file manager, right click on the ISO file and click ‘Write to Disc’:

Where it says ‘Write disc to’, you might have options like ‘File image’ as well as your CD drive. Select your CD drive.
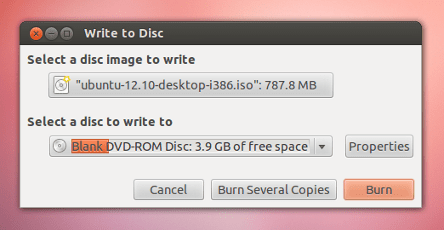
Now select write speed. For burning an Ubuntu Live CD it is recommended to write at the lowest possible speed. Finally, start the burning process.
After it finishes, verify that your CD now gave multiple files and folders and not just the ISO file you have burnt. If you can see multiple files and folders in the CD then congratulations, you have successfully completed the ISO burning process.

Enable 3 Menu Locations In New WordPress Admin Toolbar
Admin Toolbar Menus, a new WordPress plugin add 3 new menu locations to the WP toolbar and you can easily create your own custom toolbar menus with default WordPress menus functionality present in Dashboard -> Appearance -> Menus page. It supports multi level navigation and works seamlessly with existing toolbar menus.
Continue reading Enable 3 Menu Locations In New WordPress Admin Toolbar

Sticky Container Of Social Media Icons In Your Favorite Colors For WordPress
Sticky Social Icon is a simple sticky container of social media icons glued on the right side of your website. The container provides you animated social icons with css3 transitions and transform rules with different color code. To start, install and activate the plugin in your WordPress installation.
Continue reading Sticky Container Of Social Media Icons In Your Favorite Colors For WordPress

How To Set Default Admin Color Scheme For All Users In WordPress?
Now there are many plugins you can use for transforming your WordPress admin section in your own colors. Now you know how to create your own color scheme, you know how to change frontend admin bar color as per admin color scheme selected in backend, you know how to randomly change color schemes as soon any new post is published or an old post updated and there are a lot more tips, tricks and plugin.
Continue reading How To Set Default Admin Color Scheme For All Users In WordPress?

How To Easily Install Android On Your Laptop?
The tutorial is about installing Android on your laptop. This is possible for average Linux users and you can do it yourself without any coding skills required.
To Start, first thing you need to do get latest Android download so refer to Androidx86 project download page, Lookup for section RC 1 and download Android ISO for your laptop/tablet or netbook ISO and as you can see there are a few options available:

Second step is to copy it to a flash drive. You have the ISO file and now its time to write it on a USB drive so that you can boot from it on your laptop.
You can create a flash drive by using UNetBootIn, it is an open source cross platform app about which we have already discussed. If you are using Ubuntu Linux the refer to its tutorial we posted before other wise you may install it on Windows, MAC etc by refering to its webpage here. Windows users can also use Linux Live USB Creator, best for windows users.
Copy the contents of the ISO to a flash drive, unlike to other ISOs, this can be done in just 1 GB USB drive.
Finally, Third step is to boot your laptop on USB. Put your USB and boot your laptop from USB drive and follow/select from on screen instructions.
It provides you various options for partitioning, dual-botting etc. Check out the Androidx86 installation guide here.

Installing & Using UNetbootin (Bootable Linux USB Creator App) On Ubuntu
UNetbootin is an opensource cross platform application that provides you functions to easily create bootable Live USB drives for Android, Ubuntu, Fedora and other Linux distributions without any burning a CD. The application is compatible with Linux, Windows and Mac OS X. Also you can either let UNetbootin download one of the many distributions supported out-of-the-box for you, or you can supply your own Linux .iso file if you’ve already downloaded one or your preferred distribution isn’t on the list. For installing UNetbootin in Ubuntu you have to give a few simple commands from terminal.
Continue reading Installing & Using UNetbootin (Bootable Linux USB Creator App) On Ubuntu

How To Switch To Outlook.com With New Gmail Import Tool?
It is not always easy to switch between e-mail provider but the new Outlook.com’s Gmail import tool looks a bit different from past tools. This tutorial is on new Gmail import tool and here we will discuss how to switch to Outlook.com using this new tool.
To start open your Outlook.com account and follow the given steps:
Step-1 Click the gear icon and choose “More mail settings”
Step-2 Under “Managing your account,” click the “Import email accounts” and then Google. (Here is the direct link to Gmail import tool)
Step-3 From import tool page, click the Options link, By default it imports your messages to existing folders and automatically creates new directories for any custom Gmail labels you used in Gmail but still you can decide how you want to import them. Finally, click Start.
Step-4 It will prompt you to authorize Outlook.com for accessing your Gmail account, authorize it. It takes some time depending upon the quantity of messages are to be imported. After it finishes you get an e-mail with all import results.

How To Enable Any Shortcode In WordPress Comment Form?
The tutorial is on activating WordPress shortcodes functionality in comment’s form so that you can enable your commenters to use some shortcodes (assigned by you) while writing any comments on your website. Shortcode in Comment is a handy plugin for this. The plugin lets enable decide which shortcodes you would like to enable in the comment form.
Continue reading How To Enable Any Shortcode In WordPress Comment Form?

Displaying Author List With Bubble Of Total Posts In WordPress
New Author List by buffercode.com lets you display your blog author list with an hover effect that displays a bubble showing number of posts they have written on your website. Author List is a WordPress widget plugin with following features:
- You can show the Author list through widget.
- On hover displays author image, the total number of post, user name and gravatar image will be displayed.
- Site admin can set the limit of authors to display, Gravatar image size to be 24×24, 48×48 or 96×96 pixel and customize the widget title name.

So what all you have to do is install and activate this new WordPress plugin. Upon activation visit your admin area Dashboard -> Appearance -> Widgets page, drag ‘Author List’ widget to sidebar and set Custom Name, Number of Authors to show, Set Author Image Size.