Category Archives: System Engineering

How To Update ‘A’ Record IP Address On Domain Name?

An A (Address) record is a type of DNS (Domain Name System) record that links a domain name to a specific numerical address of the server where the website or service is hosted, this is called IPv4 address.

So when you copy the shared or dedicated IP address of your hosting and paste it in the A record of your DNS, it will ensure that when someone types your domain name in the web browser, it will open your website by resolving to the correct IP address of the server that is hosting your website.

To update your domain name’s IP address in the A record on Sangkrit.net, you will need to follow these steps:

Step 1. Log In to Sangkrit.net

  • Visit System.Sangkrit.net.
  • Click “Sign In” at the top-right corner and enter your account credentials.

Step 2. Access Your Domain Settings

  • Once logged in, click on your username and select “My Products” from the dropdown menu.
  • Scroll down to the “Domains” section.
  • Locate the domain you want to update and click on “DNS” next to it to manage the DNS settings.

Step 3. Find the A Record

  • On the DNS Management page, scroll down to the “Records” section.
  • Look for the A (Host) record, which should have a value like “@” under the Host column and your current IP address under the Points to column.

Step 4. Edit the A Record

  • Next to the A record, click on the pencil icon to edit the entry.
  • In the “Points to” field, enter the new IP address you want to assign to your domain.

Step 5. Save Changes

  • After updating the IP address, click Save to apply the changes.

Now allow DNS propagation time as changes can take some time to propagate across the internet, usually within a few minutes to 48 hours.

Following these steps, you can easily update your domain’s IP address in the A record on Sangkrit.net.

How To Search And Replace Across The MySQL Database Via cPanel?

There are several scenarios where someone might need to edit or perform a search and replace operation on MySQL database tables. The reasons for editing MySQL database can be website migration, updating URLs, migrating to HTTPS, fixing errors, replacing content, etc.

To search and replace across a MySQL database via cPanel, follow these steps:

Step 1: Access phpMyAdmin in cPanel

  1. Log in to cPanel: Use your username and password to access your cPanel account.
  2. Open phpMyAdmin: Scroll down to the “Databases” section and click on phpMyAdmin.

Step 2: Select the Database

  1. Choose Your Database: In phpMyAdmin, locate the list of databases on the left-hand side. Click on the database where you want to perform the search and replace operation.
  2. Backup Your Database (Optional but recommended): Before making any changes, it’s wise to back up your database. You can do this by selecting Export at the top menu and saving the file to your local computer.

Step 3: Execute the Search and Replace Query

  1. Go to the SQL Tab: Once your database is selected, click the SQL tab at the top of the phpMyAdmin interface.
  2. Enter the SQL Query: In the query box, enter the following SQL command and click the ‘Go’ button.

UPDATE table_name
SET column_name = REPLACE(column_name, ‘old_value’, ‘new_value’);

  • Replace table_name with the name of the table you want to update.
  • Replace column_name with the name of the column where the search and replace should occur.
  • Replace 'old_value' with the text you want to search for.
  • Replace 'new_value' with the text you want to replace it with.

For example, if you want to replace all instances of “oldsite.com” with “newsite.com” in the wp_posts table under the post_content column, the query would look like this:

UPDATE wp_posts
SET post_content = REPLACE(post_content, ‘oldsite.com’, ‘newsite.com’);

Clicking the Go button will execute the query. phpMyAdmin will now search for the old value and replace it with the new one.

Step 4: Review the Changes

  1. Check the Results: After running the query, review your website or relevant database entries to ensure the search and replace operation works correctly.
  2. Restore from Backup if Necessary: If something goes wrong, you can restore your database using the backup you created earlier.

Step 5: Repeat for Other Tables (If Necessary)

If you need to perform the search and replace across multiple tables or columns, repeat the process, adjusting the table_name and column_name values as needed.

Remember:

  • To be cautious when performing database operations, as they can affect your website’s functionality.
  • Always back up your database before making significant changes.
  • Consider using a WordPress plugin like Better Search Replace for more complex or extensive search and replace operations, especially if you’re dealing with serialized data.

Easily Enable Secure Two-Factor Authentication In cPanel

Two-factor authentication (2FA) is an essential security feature that adds an extra layer of protection to your cPanel account. By requiring a second form of verification in addition to your password, 2FA significantly reduces the risk of unauthorized access. Here’s a step-by-step guide on how to enable Two-Factor Authentication in cPanel.

Step 1: Log in to Your cPanel Account

  • Open your web browser and log in to your Sangkrit.net account
  • Navigate to the ‘My Products’ page and open the cPanel of VPS or Server
  • Or Open your cPanel login page via its URL
  • Enter your username and password to log in

Step 2: Access the Two-Factor Authentication Feature

  • Once logged in, locate the Security section on your cPanel dashboard.
  • Click on Two-Factor Authentication.

Step 3: Set Up Two-Factor Authentication

Configure 2FA:

  • Click on the Set Up Two-Factor Authentication button to begin the setup process.

Scan the QR Code:

  • You will be presented with a QR code that needs to be scanned using an authenticator app on your smartphone. Popular authenticator apps include Google Authenticator, Authy, and Microsoft Authenticator.
  • Open your chosen authenticator app and use it to scan the QR code displayed in cPanel.

Enter the 2FA Code:

  • After scanning the QR code, your authenticator app will generate a 6-digit verification code.
  • Enter this 6-digit code in the Security Code field provided in cPanel.
  • Click on the Configure Two-Factor Authentication button to complete the setup.

    Step 4: Verify and Confirm

    Confirmation:

    • Once the 2FA is configured, you will see a confirmation message indicating that Two-Factor Authentication has been successfully enabled.

    Backup Codes:

    • Some systems provide backup codes during the setup process. These codes can be used to access your account if you lose access to your authenticator app. Ensure you save these codes in a secure location.

      Step 5: Test Two-Factor Authentication

      Log Out:

      • Log out of your cPanel account to test the Two-Factor Authentication setup.

      Log In Back:

      • Enter your username and password as usual.
      • You will now be prompted to enter a verification code from your authenticator app.
      • Open your authenticator app, retrieve the 6-digit code, and enter it into the Two-Factor Authentication field.
      • Click login to access your cPanel account.

        Common Issues

        Time Synchronization:

        • Ensure that the time on your smartphone and the server are synchronized. Incorrect time settings can cause the verification codes to be invalid.

        Authenticator App Issues:

        • If you encounter issues with the authenticator app, try reinstalling it or use a different authenticator app to set up 2FA.

        Backup Codes:

        • If you lose access to your authenticator app, use the backup codes provided during the 2FA setup to log in and reconfigure your 2FA settings.

        Enabling Two-Factor Authentication in cPanel is a straightforward process that greatly enhances the security of your account. By following these steps, you can ensure that your cPanel account is protected by an additional layer of security, reducing the risk of unauthorized access. Regularly updating your security settings and keeping backup codes secure helps maintain the integrity of your account.

        How To Protect Your Website From Spam On cPanel Hosting & Server?

        Spam can be a significant nuisance for any website owner, clogging up email inboxes, and comment sections, and even posing security risks. Fortunately, cPanel hosting & servers offer several tools and features to help you protect your site from spam. Here’s a step-by-step guide on how to use cPanel to keep your site spam-free.

        Setting Up Email Spam Filters

        One of the primary sources of spam is email. cPanel provides powerful spam filtering tools to keep your inbox clean.

        Using SpamAssassin

        SpamAssassin is a widely used email spam filter that comes with cPanel.

        1. Log in to cPanel: Access your cPanel dashboard by entering your username and password.
        2. Navigate to Spam Filters: Look for the “Email” section and click on “Spam Filters” or “Apache SpamAssassin”.
        3. Enable Spam Filters: Turn on SpamAssassin if it’s not already enabled.
        4. Configure Settings:
          • Auto-Delete Spam: You can choose to delete emails marked as spam automatically. Be cautious with this setting to avoid losing legitimate emails.
          • Spam Score: Adjust the spam threshold score. Lower scores may catch more spam but can also flag legitimate emails.
        5. Create Spam Filters: Under “Additional Configurations”, create custom spam filters based on specific criteria such as keywords, sender addresses, and more.
        Email Filtering
        1. Navigate to Email Filters: In the “Email” section, click “Email Filters”.
        2. Select the Email Account: Choose the email account you want to filter.
        3. Create a New Filter: Click “Create a New Filter” and define the conditions and actions for the filter. For example, you can move emails containing specific words to a spam folder.

        Using BoxTrapper to Reduce Spam

        BoxTrapper is another cPanel tool that helps reduce spam by requiring all email senders to verify their identity.

        1. Navigate to BoxTrapper: In the “Email” section, click “BoxTrapper”.
        2. Select an Email Account: Choose the email account you want to protect with BoxTrapper.
        3. Enable BoxTrapper: Turn on BoxTrapper for the selected account.
        4. Configure BoxTrapper Settings: Customize the verification process, whitelist, blacklist, and ignore list to fine-tune how BoxTrapper handles incoming emails.

        Protecting Your Site from Comment Spam

        If your website has a blog or allows comments, protecting it from spam comments is crucial.

        Using cPanel’s ModSecurity

        ModSecurity is a web application firewall that helps protect your site from various threats, including spam.

        1. Navigate to ModSecurity: In the “Security” section, click “ModSecurity”.
        2. Enable ModSecurity: Turn on ModSecurity for your domain. This will help block spam bots and other malicious activities.
        Using a CAPTCHA

        Implementing a CAPTCHA on your comment forms can help prevent spam bots from submitting spam.

        1. Log in to your CMS: Access your website’s content management system such as WordPress.
        2. Install a CAPTCHA Plugin: Search for and install a CAPTCHA plugin. Popular options include reCAPTCHA and WPForms.
        3. Configure the CAPTCHA: Follow the plugin instructions to add CAPTCHA to your comment forms.

        Securing Contact Forms

        Spam bots often target contact forms to send spam messages.

        1. Install a Form Plugin: Use a reputable form plugin that offers spam protection features (e.g., WPForms, Contact Form 7).
        2. Enable Anti-Spam Features: Configure the plugin to use features like CAPTCHA, honeypot fields, or Akismet integration to filter out spam submissions.

        Implementing DNS Blackhole Lists (DNSBL)

        DNSBLs are used to block emails from known spam sources.

        1. Navigate to Email Filters: In the “Email” section, click “Email Filters”.
        2. Create a New Filter: Set up a filter that uses DNSBL to block emails from known spam IP addresses.

        Monitoring and Adjusting Settings

        Regularly monitor your spam filters and adjust the settings as needed. Check your spam and junk folders periodically to ensure legitimate emails are not being incorrectly flagged.

        By leveraging the tools and features available in cPanel, you can effectively protect your website from spam. Whether it’s filtering email, securing comment sections, or implementing CAPTCHA on forms, cPanel provides comprehensive solutions to keep your site spam-free. Regular monitoring and adjusting your settings will help maintain a clean and professional online presence.

        Migrating Your Website With Smooth Transition & Minimal Downtime

        Migrating your website to a new hosting option involves several key steps to ensure a smooth transition with minimal downtime.

        First, choose a new hosting option at Sangkrit.net that meets your needs and create a full backup of your website’s files and databases. Next, export your database and upload your site’s files to the new server. After importing the database and updating any necessary configuration files, test your website on the new server using a temporary URL to ensure everything functions correctly.

        Once satisfied, update your domain’s DNS settings to point to the new host and monitor the DNS propagation, which can take up to 48 hours. Scheduling the migration during low-traffic periods and notifying users in advance can help minimize disruption.

        By carefully planning and executing the following steps, you can ensure a successful migration with minimal impact on your website’s availability and performance.

        1. Schedule the Migration During Low Traffic Periods – Plan the migration when your website experiences the least traffic to minimize user impact.
        2. Use a Temporary URL – Use a temporary URL or IP address to test your website on the new server before changing DNS settings.
        3. Notify Users in Advance – Inform your users about the scheduled migration and potential downtime.
        4. Check DNS TTL Settings – Lower the TTL (Time to Live) settings of your DNS records to speed up the propagation process.
        5. Maintain Backup Copies – Keep multiple backup copies of your website files and database in-case something goes wrong during the migration.
        6. Test Thoroughly – Test all aspects of your website, including forms, payment gateways, and interactive elements, on the new host before going live.
        7. Monitor the Website Post-Migration – Closely monitor your website after the migration for any issues and address them promptly.
        8. Ensure Compatibility – Check that all plugins, themes, and scripts are compatible with the new hosting environment.

        By following these tips, you can ensure a smooth website migration with minimal downtime and disruption to your users. The steps may slightly differ based on the type of CMS or framework you are migrating. If you are migrating a WordPress site, follow this lesson here.

        Answers To Your Most Common Website Hosting Questions

        A strong online presence is essential for everyone, businesses, organizations, and individuals. At the heart of this presence is a website, a platform that serves as a virtual storefront, information hub, or personal portfolio. However, for a website to be accessible to visitors around the globe, it needs to be hosted on a server. This is where web hosting comes into play.

        What is Web Hosting?

        Web hosting is a service that allows individuals and organizations to post a website or web page onto the Internet. A web host, or web hosting service provider, is a system that provides the technologies and services needed for the website or webpage to be viewed on the Internet.

        Different types of web hosting services are available

        1. Shared Hosting

        Overview: In shared hosting, multiple websites share a single server and its resources (such as CPU, RAM, and storage).

        Pros:

        • Cost-effective, making it ideal for beginners and small websites.
        • Easy to set up with minimal technical knowledge required.

        Cons:

        • Limited resources can lead to slower performance if other sites on the server consume too much bandwidth.
        • Less control over server settings.

        2. VPS (Virtual Private Server) Hosting

        Overview: VPS hosting uses virtualization technology to provide dedicated resources on a shared server. Each website is hosted on its own virtual server.

        Pros:

        • More reliable and stable than shared hosting.
        • Greater control over server settings and configurations.
        • Scalability: Easier to upgrade resources as needed.

        Cons:

        • More expensive than shared hosting.
        • Requires some technical knowledge to manage.

        3. Dedicated Hosting

        Overview: Dedicated hosting provides an entire physical server exclusively for one website.

        Pros:

        • Full control over server settings and configurations.
        • High performance and reliability due to dedicated resources.
        • Enhanced security, as no other websites share the server.

        Cons:

        • Expensive, and suitable for large businesses or high-traffic websites.
        • Requires technical expertise to manage and maintain the server.

        4. Cloud Hosting

        Overview: Cloud hosting uses a network of virtual servers that host websites, offering scalable resources and high availability.

        Pros:

        • Scalability: Resources can be easily adjusted based on demand.
        • High reliability and uptime, as websites are hosted on multiple servers.
        • Cost-effective, as you pay only for the resources you use.

        Cons:

        • Can be more complex to set up and manage.
        • Costs can fluctuate based on resource usage.

        5. Managed Hosting

        Overview: In managed hosting, the hosting provider takes care of the technical aspects of running a server, including maintenance, security, and updates.

        Pros:

        • Less technical work for the website owner.
        • Enhanced security and performance, as the provider handles server optimization.
        • Ideal for businesses that prefer to focus on their core activities.

        Cons:

        • More expensive than unmanaged hosting.
        • Less control over certain server settings and configurations.

        6. WordPress Hosting

        Overview: Specifically optimized for WordPress websites, this hosting type offers features and performance tailored to the WordPress platform.

        Pros:

        • Optimized for speed and security for WordPress sites.
        • Often includes pre-installed WordPress, automatic updates, and dedicated support.
        • Cons:
          • Limited to WordPress websites.
          • Can be more expensive than general shared hosting.

        7. Reseller Hosting

        Overview: Reseller hosting allows individuals or businesses to purchase hosting resources and resell them to their clients. This comes packed with any VPS or Dedicated Server you subscribe to at Sangkrit.net.

        Pros:

        • Ideal for entrepreneurs or businesses looking to offer web hosting services.
        • Provides control over allocated resources and pricing for clients.

        Cons:

        • Requires knowledge of web hosting to manage multiple client accounts.
        • Customer support responsibility falls on the reseller.

        Each type of web hosting service has its unique advantages and disadvantages. The right choice depends on your website’s specific needs, your budget, and your level of technical expertise. Whether you’re just starting with a small blog or running a large eCommerce site, there’s a hosting solution that can meet your requirements.

        Can I Host Multiple Websites on One Hosting Account?

        Yes, you can host multiple websites on one hosting account, but this depends on the type of hosting plan you choose. Here’s how it works:

        • Add-On Domains: Many shared hosting plans offer the option to host multiple websites using add-on domains. Each add-on domain can have its website with separate content.
        • Subdomains: You can also create subdomains, which are extensions of your main domain (e.g., blog.yourdomain.com) and can be used to host different sections or smaller websites.

        How Do I Transfer My Website to a New Hosting Provider?

        Here are some lessons that may help while you migrate your website, following are the basic tips involved during this process:

        1. Schedule the Migration During Low Traffic Periods– Plan the migration during times when your website experiences the least traffic to minimize the impact on users.
        2. Use a Temporary URL– Use a temporary URL or IP address to test your website on the new server before changing DNS settings.
        3. Notify Users in Advance– Inform your users about the scheduled migration and potential downtime.
        4. Check DNS TTL Settings– Lower the TTL (Time to Live) settings of your DNS records to speed up the propagation process.
        5. Maintain Backup Copies– Keep multiple backup copies of your website files and database in case something goes wrong during the migration.
        6. Test Thoroughly– Test all aspects of your website, including forms, payment gateways, and interactive elements, on the new host before going live.
        7. Monitor the Website Post-Migration– Closely monitor your website after the migration for any issues and address them promptly.
        8. Ensure Compatibility– Check that all plugins, themes, and scripts are compatible with the new hosting environment.

        By following these steps and tips, you can ensure a smooth website migration with minimal downtime and disruption to your users.

        Hope this comprehensive guide on web hosting answers has provided you with valuable insights and answers to your most common questions. Choosing the right web hosting service is a crucial step in ensuring your website’s success, and we’re here to help you make informed decisions.

        If you have any additional questions or need further clarification on any aspect of web hosting, feel free to leave your comments below. Whether you’re a beginner just starting or an experienced webmaster looking for advanced tips, we’d love to hear from you. Your questions and experiences not only help you but also benefit our entire community of readers.

        So, don’t hesitate – share your thoughts, ask your questions, and continue the conversation about web hosting!

        Plesk Vs cPanel Web Hosting, Which One Is Better For You?

        When choosing between Plesk and cPanel, several factors should be considered, as both have distinct advantages and may be better suited to different users based on their specific needs. Here is a comparison to help you decide which one might be better for you:

        1. User Interface

        • Plesk: Known for its modern, clean, and user-friendly interface. It’s considered more intuitive, especially for beginners.
        • cPanel: Has a more traditional interface that some users find cluttered. However, it is also highly functional and well-organized for those familiar with it.

        2. Operating System Compatibility

        • Plesk: Supports both Linux and Windows operating systems, providing greater flexibility in server environment choices.
        • cPanel: Primarily supports Linux-based servers (CentOS, CloudLinux, RHEL, AlmaLinux, and Ubuntu), with no official support for Windows.

        3. Features and Tools

        • Plesk:
          • Strong in web application management, with built-in support for Docker, Git, and Node.js.
          • Offers a variety of extensions and integrations, including a comprehensive WordPress Toolkit.
          • Provides robust security features like Fail2Ban, built-in firewall, and automatic SSL/TLS certificate management.
        • cPanel:
          • Highly popular in the hosting industry, making it easy to find hosting services and support.
          • Offers extensive features for domain, email, and database management.
          • Integrates with WHM (Web Host Manager) for powerful reseller and server management.

        4. Security

        • Plesk: Offers integrated security tools such as Fail2Ban, ModSecurity, and Let’s Encrypt for SSL certificates. Security settings are easily managed through the interface.
        • cPanel: Also provides robust security features, including Imunify360, CSF (ConfigServer Security & Firewall), and auto-SSL for easy certificate management.

        5. Customization and Extensibility

        • Plesk: Known for its wide range of extensions available through the Plesk Extension Catalog, allowing extensive customization.
        • cPanel: Supports a variety of plugins and has a strong community contributing to its ecosystem, providing numerous customization options.

        6. Ease of Use

        • Plesk: Often preferred by beginners due to its straightforward and intuitive design.
        • cPanel: Favored by experienced users and web hosting professionals for its comprehensive and familiar interface.

        7. Performance and Resource Management

        • Plesk: Offers detailed resource usage statistics and monitoring tools, making it easier to manage server resources effectively.
        • cPanel: Also provides excellent resource management and performance monitoring, with tools to track server load, disk space usage, and more.

        8. Support and Community

        • Plesk: Provides comprehensive documentation, dedicated support, and a supportive community forum.
        • cPanel: Has extensive online documentation, a large user community, and strong support channels, making it easy to find help and resources.

        9. Cost

        • Plesk: Generally considered slightly more expensive than cPanel, but the difference may be justified by the additional features and support for Windows servers.
        • cPanel: Typically less expensive, especially for small to medium-sized hosting setups on Linux servers.

        Conclusion

        • Choose Plesk if you need a user-friendly interface, support for both Linux and Windows, robust security features, and extensive development tools.
        • Choose cPanel if you prefer a traditional interface, need a widely-supported Linux-based hosting solution, and require strong integration with WHM for reseller hosting and server management.

        Ultimately, the choice between Plesk and cPanel depends on your specific requirements, familiarity with the platforms, and the hosting environment you intend to use. Both are powerful and reliable control panels with their own strengths.

        How To Subscribe To A Plesk Or cPanel Web Hosting Platform?

        You simply need to register your domain name and then subscribe to a Plesk Hosting plan.

        Things You Don’t Know About Plesk, It Works With Linux

        Yes, Plesk is compatible with Linux. Plesk is a web hosting control panel that supports both Linux and Windows operating systems. On Linux, Plesk can be installed on various distributions, including:

        • CentOS
        • Red Hat Enterprise Linux (RHEL)
        • Ubuntu
        • Debian

        Plesk provides a user-friendly interface for managing web hosting environments, including features like domain management, email accounts, databases, and security settings. It’s widely used by web hosting providers and administrators to simplify the management of their hosting services.

        Plesk offers several advantages for web hosting management, making it a popular choice among web hosting providers and administrators. Here are some key benefits:

        1. User-Friendly Interface

        Plesk’s intuitive and easy-to-navigate interface allows users of all skill levels to manage websites, domains, email accounts, and other server resources efficiently.

        2. Cross-Platform Compatibility

        Plesk supports both Linux and Windows operating systems, providing flexibility in choosing the server environment that best suits your needs.

        3. Comprehensive Management Tools

        Plesk includes a wide range of tools for managing various aspects of web hosting, such as:

        • Domain Management: Easily add and manage multiple domains and subdomains.
        • Email Management: Create and manage email accounts, configure spam filters, and set up email forwarding.
        • Database Management: Support for MySQL, PostgreSQL, and other databases with easy backup and restore options.
        • File Management: Web-based file manager for uploading, editing, and organizing files.

        4. Security Features

        Plesk offers robust security features to protect your server and websites, including:

        • Firewall Management: Integrated firewall to manage network traffic.
        • SSL Certificate Management: Easy installation and management of SSL certificates.
        • Fail2Ban Integration: Protection against brute force attacks.
        • Malware Scanning: Built-in tools to scan and remove malware.

        5. Automation and Scripting

        Plesk supports automation through its powerful CLI (Command Line Interface) and API (Application Programming Interface), enabling administrators to automate repetitive tasks and integrate with other systems.

        6. Extension Ecosystem

        Plesk has a rich ecosystem of extensions available through the Plesk Extension Catalog. These extensions add additional functionality, such as:

        • SEO Toolkit: Tools for improving website search engine optimization.
        • WordPress Toolkit: Comprehensive management of WordPress installations.
        • Git Integration: Tools for deploying applications from Git repositories.

        7. Resource Management and Monitoring

        Plesk provides detailed resource usage statistics and monitoring tools to help manage server resources effectively. This includes CPU, memory, disk space, and bandwidth monitoring.

        8. Backup and Recovery

        Plesk includes built-in backup and recovery options, allowing administrators to schedule regular backups of websites, databases, and server configurations.

        9. Multi-Tenant Environment

        Plesk supports multi-tenancy, making it ideal for hosting providers who need to manage multiple clients or resellers on a single server.

        10. Developer-Friendly Features

        Plesk offers features tailored for developers, such as support for multiple PHP versions, Node.js, Ruby, and Docker integration, allowing for a flexible development environment.

        11. Customer Support and Community

        Plesk provides access to comprehensive documentation, a dedicated support team, and an active community forum where users can find solutions and share knowledge.

        These advantages make Plesk a powerful and versatile tool for web hosting management, catering to both small businesses and large enterprises.

        How To Subscribe A Plesk Web Hosting?

        You simply need to register your domain name and then subscribe to a Plesk Hosting plan.

        How To Choose Between DV, SAN & EV SSL Certificates?

        UCC (Unified Communications Certificate) and SAN (Subject Alternative Name) DV (Domain Validated) SSL certificates are both types of SSL/TLS certificates used to secure websites and online communications. While they serve similar purposes, there are some key differences between them:

        Usage and Compatibility

        • UCC SSL certificates are specifically designed for use with Microsoft Exchange and Microsoft Office Communications Server (OCS), which require SSL certificates with multiple domain names (also known as Subject Alternative Names or SANs) to secure various services such as Outlook Web Access, Autodiscover, and Unified Messaging.
        • SAN DV SSL certificates, on the other hand, are more general-purpose SSL certificates that support multiple domain names (SANs) and can be used with a wide range of web servers and applications. They are commonly used to secure websites with multiple domain names or subdomains.

        Validation Process

        • Both UCC and SAN DV SSL certificates are Domain Validated (DV) certificates, meaning that the certificate authority verifies only the domain ownership of the applicant. This validation process is typically automated and does not involve extensive vetting of the organization or individual requesting the certificate.
        • As DV certificates, neither UCC nor SAN SSL certificates provide any information about the identity or legitimacy of the organization or individual behind the website. They simply confirm that the applicant has control over the domain(s) listed in the certificate.

        Number of SANs Supported

        • UCC SSL certificates typically support a higher number of Subject Alternative Names (SANs) compared to SAN DV SSL certificates. UCC certificates can secure multiple domain names (up to 250 or more), making them ideal for large organizations with complex IT infrastructures and multiple domains.
        • SAN DV SSL certificates typically support a more limited number of SANs, often ranging from 1 to 100 domain names or subdomains. While this may be sufficient for many websites and small businesses, organizations with a larger number of domain names may require a UCC certificate for comprehensive coverage.

        Price and Availability

        • UCC SSL certificates tend to be more expensive than SAN DV SSL certificates due to their advanced features and support for a higher number of SANs. The cost of UCC certificates may vary depending on the number of SANs included and the certificate authority (CA) issuing the certificate.
        • SAN DV SSL certificates are more affordable and widely available, making them a popular choice for small to medium-sized businesses and website owners looking to secure multiple domain names or subdomains without breaking the bank.

          While both UCC and SAN DV SSL certificates offer support for multiple domain names, UCC certificates are specifically tailored for Microsoft environments and support a higher number of SANs. SAN DV SSL certificates, on the other hand, are more versatile and cost-effective, making them suitable for a wide range of web servers and applications. The choice between the two depends on your specific requirements, budget, and compatibility with your IT infrastructure.

          The Extended Validation of EV SSL

          Extended Validation (EV) SSL certificates are a type of SSL/TLS certificate that provides the highest level of validation and assurance for websites. Unlike Domain Validated (DV) and Organization Validated (OV) certificates, which only verify domain ownership and basic organization information, EV SSL certificates undergo a rigorous validation process to verify the legal identity and legitimacy of the organization behind the website.

          The main features of EV SSL certificates include:

          1. Extended Validation Process: The validation process for EV SSL certificates involves thorough vetting of the organization’s legal identity, operational existence, physical address, and ownership details. Certificate authorities (CAs) conduct extensive background checks and verification procedures to ensure that the organization is legitimate and trustworthy.
          2. Green Address Bar: One of the most distinctive features of EV SSL certificates is the green address bar that appears in the browser when visitors access a website secured with an EV certificate. This green bar provides visual assurance to users that the website is authenticated and belongs to a legitimate organization. It helps build trust and confidence among visitors, increasing conversion rates and reducing the risk of phishing attacks.
          3. Highest Level of Encryption: Like other SSL/TLS certificates, EV SSL certificates provide strong encryption to secure data transmitted between the website and visitors’ browsers. They use industry-standard encryption algorithms (e.g., RSA or ECC) and support key lengths of 2048 bits or higher to protect sensitive information from unauthorized access and interception.
          4. Browser Compatibility: EV SSL certificates are widely supported by modern web browsers, including Google Chrome, Mozilla Firefox, Apple Safari, Microsoft Edge, and others. They are recognized and trusted by all major browsers, ensuring that visitors see the green address bar and know that the website is authenticated and secure.
          5. Enhanced Trust and Credibility: By displaying the green address bar and undergoing a stringent validation process, websites secured with EV SSL certificates demonstrate a commitment to security and trustworthiness. This can have a positive impact on brand reputation, customer confidence, and online credibility, leading to increased user engagement, sales, and conversions.

          Overall, EV SSL certificates offer the highest level of validation, security, and trust for websites, making them ideal for e-commerce sites, financial institutions, government agencies, and any organization that values online trust and credibility. While EV certificates may be more expensive and require more extensive validation compared to DV and OV certificates, the benefits of enhanced security and customer trust justify the investment for many businesses and organizations.

          How To Choose & Subscribe?

          You may either choose the choice of your SSL from Sangkrit.net Regular SSL Service which also offers another SSL option called EV SSL i.e. extended validation. Alternatively, you may go for Managed SSL Service where a team handles the installation and maintenance of your SSL over your websites.

          How To Repair MySQL Database?

          A MySQL database is a relational database management system (RDBMS) that utilizes structured query language (SQL) to store, retrieve, and manage structured data.

          MySQL databases consist of tables organized into rows and columns, with each table representing a specific data entity and each row representing a single record or entry. MySQL is widely used for web applications and websites, offering features such as data integrity, transaction support, scalability, and robust security mechanisms.

          It is an open-source database system, making it accessible and customizable for a wide range of applications and industries. MySQL is known for its reliability, performance, and ease of use, making it a popular choice for developers and businesses seeking a powerful and cost-effective solution for managing their data.

          Repairing a MySQL database involves several steps to identify and fix any issues that may be causing corruption or damage to the database. But to fix a database you need to access it. To access a MySQL database on cPanel, you typically follow these steps:

          1. Log in to cPanel: Open your web browser and navigate to your cPanel login page. This is usually accessed by appending “/cpanel” to your domain name (e.g., yourdomain.com/cpanel). Enter your cPanel username and password to log in. If this doesn’t works, then alternatively you can access the cPanel from your hosting’s account page.
          2. Locate the MySQL Databases Icon: Once logged in, you’ll see a variety of icons representing different features and functions available in cPanel. Look for the “MySQL Databases” or “Databases” icon, which is usually located under the “Databases” section.
          3. Access MySQL Databases: Click on the “MySQL Databases” icon to access the MySQL Databases interface. This interface allows you to manage your MySQL databases, including creating new databases, adding users, and assigning privileges.
          4. Locate Your Database: In the MySQL Databases interface, you’ll see a list of existing databases under the “Current Databases” section. Each database will have a name preceded by your cPanel username and an underscore (e.g., username_database1). Locate the database you want to access.
          5. Access phpMyAdmin: To interact directly with your MySQL database, click on the “phpMyAdmin” icon, which is usually located next to the database name. phpMyAdmin is a web-based application that provides a graphical user interface for managing MySQL databases.
          6. Log in to phpMyAdmin: After clicking on the phpMyAdmin icon, you’ll be directed to the phpMyAdmin login page. Enter the username and password for the MySQL database user associated with the database you want to access. This may be different from your cPanel login credentials.
          7. Navigate Your Database: Once logged in to phpMyAdmin, you’ll see a list of databases on the left-hand side of the screen. Click on the name of the database you want to access to expand it and view its tables. You can then click on individual tables to view and manage their contents.
          8. Perform Database Operations: From the phpMyAdmin interface, you can perform various database operations, such as running SQL queries, creating or modifying tables, importing or exporting data, and managing users and permissions.
          9. Log Out and Close phpMyAdmin: After you’ve finished working with your database, be sure to log out of phpMyAdmin to secure your data. You can do this by clicking the “Log Out” button in the phpMyAdmin interface. Once logged out, you can close the phpMyAdmin window or tab.

          By following these steps, you can easily access and manage your MySQL databases on cPanel using phpMyAdmin.

          Here’s a general guide on how to repair a MySQL database:

          Backup Your Database: Before making any changes to your database, it’s essential to create a backup to ensure that you can restore your data in case anything goes wrong during the repair process. You can use MySQL’s built-in tools or third-party backup solutions to create a backup of your database.

          Identify Database Issues: Use MySQL’s diagnostic tools to identify any issues or errors in your database. You can check the MySQL error log, run diagnostic queries, or use tools like MySQL Workbench to analyze the database’s structure and integrity.

          Use MySQL Check Table Command: MySQL provides a built-in command called CHECK TABLE that allows you to check the integrity of tables in your database and repair any corruption or damage. You can use this command to check individual tables or the entire database.

          CHECK TABLE table_name;

          Use MySQL Repair Table Command: If the CHECK TABLE command identifies any issues with your tables, you can use the REPAIR TABLE command to fix them. This command repairs corrupted tables by rebuilding the table’s indexes and data structure.

          REPAIR TABLE table_name;

          Use MySQL Repair Database Command: If you suspect that your entire database is corrupted, you can use the REPAIR DATABASE command to repair all tables in the database at once.

          REPAIR DATABASE database_name;

          Use MySQL Table Maintenance Operations: MySQL provides additional table maintenance operations, such as OPTIMIZE TABLE and ANALYZE TABLE, which can help improve the performance and integrity of your database. You can use these commands periodically to optimize and maintain your database.

          OPTIMIZE TABLE table_name;

          ANALYZE TABLE table_name;

          Monitor Repair Progress and Errors: During the repair process, monitor the progress and check for any errors or warnings that may occur. This will help you ensure that the repair is successful and that no further issues arise.

          Verify Database Integrity: After repairing your database, verify its integrity by running diagnostic queries and checking for any remaining issues. Ensure that your data is intact and that the database functions properly.

          Regular Maintenance and Monitoring: To prevent future database issues, implement regular maintenance tasks such as backups, monitoring, and optimization. Regularly check for errors, monitor database performance, and address any issues promptly to keep your MySQL database healthy and reliable.

          By following these steps and best practices, you can repair your MySQL database and ensure that it remains stable, reliable, and free from corruption or damage.

          How cPanel Accounts Are Created On WHM Of VPS & Dedicated Server?

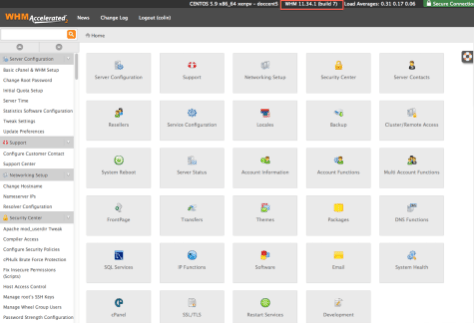
          cPanel equips you with an easy interface to manage your domains and websites. The cPanel account at Sangkrit.net gives you access to several free applications to let you easily make different types of websites in a very short interval of time and that too without any technical skills.

          But do you know you can also create separate cPanel hosting accounts on your Sangkrit.net VPS or Dedicated Server by using the WHM interface? Each cPanel account can have its primary domain and each can be given the privilege to host multiple domains. You can also set resource limits over new cPanel accounts. This includes disk space, bandwidth, email accounts, and more. You can either use the package defaults or customize these limits as per your requirements.

          To create a new cPanel account you will need to set the following things:

          1. Domain: The domain name for the new cPanel account.
          2. Username: A username for the new account.
          3. Password: A strong password for the new account or you may also use the password generator.
          4. Email: An email address associated with the account.
          5. Package: The hosting package or resource allocation for the account. If needed, you can create custom packages in WHM.
          6. Settings: You may also configure any additional settings such as selecting a theme, enabling or disabling DNS clustering, and more.

          Then simply follow these steps to create a new cPanel account:

          1. Login to your Sangkrit.net Account
          2. Click the Servers tab
          3. Click Manage button
          4. You will be directed to your server’s admin panel
          5. Click Account Functions or use the search box to find it
          6. Click Create a New Account
          7. Fill up the mandatory fields and click Create

          Now the Web Host Manager will display you a results page outlining your new Account. Next, you will see Account Creation Complete!!! at the bottom of the screen. Simply repeat the steps to create more cPanel accounts.

          The accounts you create are accessible from the Servers tab on your Sangkrit.net products page. Go back to step no. 1, and you will see all your cPanel accounts are listed there. The new account holders would be able to log in to cPanel with the provided username and password to manage their website, email, and other hosting-related services.

          How To Allocate Resources To Your Websites On Dedicated Server & VPS?

          Allocating and managing resources means creating hosting packages containing a set resource usage allowance for domains and websites you want to host on your dedicated server or VPS. You can set the maximum amount of resources that a domain can use so that other websites won’t get affected by it. 

          • If you are running only one website then you may simply allot all server resources to it
          • If you are running multiple websites then you may either set a resource quota for each website or let all your websites freely use server resources

          This lesson will guide you in creating new hosting packages, allocating resources, and assigning them to your domains.

          Log in to your Sangkrit.net Account then follow these steps:

          1. Visit Products page
          2. Click the Servers tab
          3. Next to the account, you want to use, click Launch
          4. From the management interface, next to the cPanel Site,
          5. Click Manage Server (WHM) 
          6. Click Proceed

          On your server’s home, add a new package:

          1. Find the Packages section on the left sidebar,
          2. Click Add a Package

          Define regulations such as:

          1. Disk space
          2. Max domains
          3. Max bandwidth usage
          4. Max database usage
          5. Max email, etc

          As required by you, each or selective option can be left to unlimited. Now, click the blue color Add button at the bottom of the screen. That’s it, your package has been successfully created.

          This way you can create as many packages as you want, and each package will work as a separate cPanel hosting account. You can edit or delete any packages by revisiting the packages page from the left sidebar of your dedicated server‘s home. The same steps also work for virtual private servers.

          How To Make Your Website On A Dedicated Server?

          A dedicated server is the most advanced form of web hosting where the client leases an entire server that is not shared with anyone else. It can handle a huge load of traffic and heavy page requests. Thus, it prevents your website from going down at the time when your traffic starts to rise.

          Setting up a dedicated server is easy. Just subscribe to your choice of dedicated server here,

          and then follow these steps:

          1. Login to your Sangkrit.net Account
          2. Click the Servers tab
          3. Click Launch (next to the account you want to use)
          4. Click Set Up (for the account you want to use )
          5. It will offer you a form as given below:
          SERVER NAMEGive a name to your new server.
          USER NAMEType in username to log in to your server.
          Create a password for your username to log in to your server.Type in your username to log in to your server.
          DATA CENTER REGIONSelect the location where you want to keep your server.
          IMAGESelect the operating system you want to use.
          CONTROL PANELSelect cPanel.
          IMPORT YOUR SITESYou may select any old cPanel shared hosting accounts that you want to import to your new server.

          Fill in the details, and then click the Create button. 

          This will take a few seconds to set up, and then you can access your cPanel by following these steps:

          1. Log in to Account Manager 
          2. Click the Servers tab
          3. Next to the cPanel account, which you want to use, click Launch

          To make, manage, or transfer a website –

          Visit the cPanel of the domain name (which you have created in the above-given steps) and follow these steps:

          1. Log in to Account Manager 
          2. Click the Servers tab
          3. Click the cPanel site you want to use

          That’s it, now you may install WordPress to startup your website or eCommerce store. The same steps work for all virtual private servers.

          How To Create A cPanel Account To Host Domain On Your Dedicated Server?

          For hosting your domain names, you are required to create at least one cPanel account on your dedicated server.

          What is cPanel?

          A cPanel offers you a user-friendly interface for hosting your domains, managing your website files, as well as installing web-building applications like WordPress, etc.

          The cPanel at Sangkrit.net offers you more than a hundred website maker apps as well as free backup solutions.

          First, complete the basic setup of your dedicated server, and then you will be able to create multiple cPanel hosting accounts and associate them with specific domain names of yours.

          Creating a cPanel Hosting Account:

          1. Login to your Sangkrit.net Account
          2. Click the Servers tab
          3. Click Manage button

          You will be directed to your server’s admin panel, here –

          Use the left-side search box to find List Accounts

          1. Click List Accounts
          2. Click Create a New Account button

          It will present you with a form where you can type in your domain name and select options for the cPanel account you are creating. Finally, click the ‘Create’ button to create a new cPanel account for your domain.

          After you have created a cPanel account, you can access it by following these steps:

          1. Visit your Sangkrit.net Account
          2. Click the Servers tab

          And, you will see that your cPanel account is listed in the Servers tab.

          Note: Some operating systems don’t support cPanel. So, while filling the cPanel setup form (as shown in step five), make sure to check for any possible warnings in the operating system field.

          Make sure that your domain name is pointed towards your dedicated server. Read these lessons:

          1. How to point a domain name to a dedicated server
          2. What is my dedicated server’s IP address?

          To add more domains, you might need to enable the remote domains on your dedicated server:

          The same steps also work on all virtual private servers.

          How To Host Multiple Domains & Websites On VPS & Dedicated Server?

          After you have subscribed to a dedicated server, the first thing you need to do is set it up for your main domain. Afterward, you can add multiple domains to your server or create other cPanel hosting accounts on your server to add domains.

          For Hosting Multiple Domains From Server’s Admin Panel

          This option lets you create different cPanel accounts for each of your domain names.

          While creating any new cPanel account you can allow it to host multiple domains or simply keep it limited to only one domain. You can do this at your discretion by following these steps:

          1. Login to your Sangkrit.net Account
          2. Click the Servers tab
          3. Click Manage button
          4. You will be directed to your server’s admin panel
          5. Use the left-side search box to find the List Accounts page
          6. Click List Accounts
          7. Click Create a New Account button

          It will present you with a form where you can type in your domain name and select options for the new cPanel account you are creating.

          Finally, click the ‘Create’ button.

          Follow the same steps for creating separate accounts for your domains.

          For Hosting Multiple Domains On A cPanel Account

          You can allow any cPanel account on your dedicated server to host multiple domains. This thing is done while creating new cPanel accounts (as we have done above) or you can edit any old account.

          To edit any old cPanel account simply visit the ‘List Accounts’ page (as shown in step no. 6 above).

          To host multiple domains on cPanel:

          1. Log in to Account Manager 
          2. Click the Servers tab
          3. Next to the cPanel account, which you want to use, click Launch

          Next, on the cPanel home page:

          1. Scroll down to the Domains section
          2. Click ‘Addon Domains
          3. Type in the domain name
          4. Click the ‘Add Domain‘ button

          Each domain added by you will have its directory where you can upload your website or install WordPress. The web directory of your domains can be accessed from your cPanel’s home page -> File Manager option, present in the Files section.

          Make sure you update your domain name servers to make it point to your dedicated server.

          How To Get Helped?

          In case you need any kind of assistance in hosting your domain names on your dedicated server, simply comment below or use the Helpline number.

          The Difference Between cPanel & WHM Hostings & Servers

          Linux VPS or Dedicated Server provides you with WHM to manage your website hosting accounts. WHM allows you to host multiple websites on different domains but that’s what cPanel may also do. So what is the difference?

          The difference is that WHM allows you to set up separate cPanel accounts for websites and not only this but you can assign a package to limit the resource usage of websites hosted on your server.

          Now if you only have one single website to host on your server and you want to use all your resources on that specific website then you simply set cPanel without assigning any package to it.

          WHM

          WHM stands for Web Host Manager. It is the main control panel for setting up a server and not the websites on the server, but the server itself. Setting up a website is the second step which you do after creating new cPanel accounts from the WHM of your server.

          The Differences Between WHM & cPanel

          WebHost Manager, or WHM, provides administrative control of your dedicated or Virtual Private Server (VPS). You use WebHost Manager to create individual accounts, add domains to your server, manage hosting features, and perform basic system and control panel maintenance

          The main features of WHM are:

          1. Server-Level Control Panel: WHM is designed for hosting providers and server administrators. It’s used to manage the server as a whole and to create and manage cPanel accounts for individual hosting clients.
          2. Server Management: WHM focuses on server-level tasks, such as server configuration, software installation, security settings, and resource allocation to individual cPanel accounts.
          3. Reseller Hosting: WHM allows for the creation of reseller hosting accounts. Resellers can use cPanel to create and manage their own hosting clients and accounts.
          4. Security: WHM offers server-level security settings and access controls for managing cPanel accounts, including the ability to enforce security policies for all hosted accounts.
          5. Resource Allocation: WHM lets administrators allocate resources like disk space, bandwidth, and other server resources to cPanel accounts.
          6. User Authentication: WHM is accessed by administrators using their own login credentials. It’s used to create and manage cPanel accounts, each with its own set of credentials.
          7. Typical Users: WHM is used by hosting providers, data center operators, and server administrators who manage multiple hosting clients or accounts.
          cPanel

          The cPanel is designed for managing particular domains or hosting accounts on your server. End users can control everything from adding/removing email accounts to administering MySQL databases etc.

          The main features of cPanel are:

          1. End-User Control Panel: cPanel is designed for end-users, typically website owners, and administrators who manage their hosting accounts. It provides an easy-to-use graphical interface for various website and account management tasks.
          2. Website Management: cPanel is primarily used to manage individual websites and their associated settings, such as creating and managing email accounts, databases, file management, and domain settings.
          3. User-Level Features: cPanel offers features like website backups, email management, website statistics, domain management, and one-click application installations (e.g., WordPress).
          4. Security: While cPanel provides security features, it focuses on the security of individual hosting accounts and websites.
          5. Resource Usage: cPanel allows users to monitor and manage their resource usage, including bandwidth and storage.
          6. User Authentication: Users log in to cPanel with their credentials.
          7. Typical Users: cPanel is used by website owners, bloggers, small business owners, and anyone with a web hosting account.

          cPanel is the end-user control panel used by individuals and businesses to manage their website and hosting account, while WHM is the server-level control panel used by hosting providers and server administrators to manage server resources, create and manage hosting accounts, and enforce security and resource allocation policies for multiple cPanel users. The two often work in tandem, with WHM allowing administrators to create and manage cPanel accounts for their clients.

          How To Resell Hostings After Subscribing A Dedicated Server?

          If you are a web developer looking forward to setting up your own reseller hosting then this lesson will guide you step-by-step in creating your own reseller account on a Dedicated Server or VPS of Sangkrit.net.

          What is a Reseller Account?

          A reseller account is a special account created from WHM of a Dedicated Server or VPS. It is a cPanel account with more privileges.

          The system allows reseller accounts access to a limited version of the WHM interface, which allows them to manage the cPanel accounts that they sell.

          A reseller can allocate system resources on individual cPanel hosting accounts and then sell them to his clients.

          To start up with a reseller account, you must own a Dedicated Server or VPS. Read our lesson on configuring a server at Sangkrit.net to start with WHM and cPanel.

          How To Manage Reseller Accounts?

          You can manage reseller accounts using one of the following WHM user interfaces:

          • The Resellers section (Home -> Resellers) provides you access to all of the reseller features.
          • The Reseller Center interface (Home -> Resellers -> Reseller Center) allows you to add or remove reseller privileges and provides links to all of the other reseller features.

          By default, the system grants a set of limited privileges to reseller accounts. But you can add more privileges to any reseller account using the Edit Reseller Nameservers and Privileges interface present in Home -> Resellers -> Edit Reseller Nameservers and Privileges section.

          How Nameservers Are Configured On Dedicated Server & VPS?

          Nameservers are used for masking IP addresses to domain names.

          However, you can directly mask an IP address to different records of your domain name to make it functional. But doing a nameserver setup lets you enlist all domain records in your nameservers to use them on your domain (website & email, etc).

          Configuring Nameservers On Dedicated Server (Via WHM):

          1. Log in to your Sangkrit.net account
          2. Open the Products page and click the Servers tab
          3. Click Launch (Next to the account, you want to use)
          4. Click Manage Server (WHM) 
          5. Click Proceed

          Once, you are logged in to your server, follow these steps:

          1. Navigate to WHM’s Nameserver Selection interface via WHM -> Home -> Service Configuration -> Nameserver Selection
          2. Select the desired nameserver software
          3. Click Save

          To configure your default nameservers:

          1. Navigate to WHM’s Basic WebHost Manager Setup interface via WHM -> Home -> Server Configuration -> Basic WebHost Manager Setup
          2. Enter the desired nameserver names in the text boxes
          3. Click Save

          Remember, the name must prefix, a dot (.), and your domain. For instance: ns1.example.com and ns2.example.com.

          Next, you will need to add the IP address to your nameservers:

          1. Navigate to WHM’s Add a New IP Address interface via WHM -> Home -> IP Functions -> Add a New IP Address
          2. Here you may either enter the main IP address or the IP address range (if you have one) in the New IP or IP range to add a text box
          3. Enter the subnet mask in the Select a subnet mask for the IP or IPs above to use the text box
          4. Enter any IP addresses that you wish to exclude in the IPs and IP ranges to exclude from the range of new IPs text box
          5. Click Submit

          Creating A or AAAA entries on your nameservers:

          1. Access WHM’s Basic WebHost Manager Setup interface via WHM -> Home -> Server Configuration -> Basic WebHost Manager Setup
          2. In the Nameservers text box, click Configure Address Records
          3. Update the IP addresses in the appropriate text boxes
          4. Click Configure Address Records
          5. Click Close

          Repeat the same steps for each of your nameservers.

          For creating entries of your hostname:

          1. Again, move to WHM’s Add an A Entry for Your Hostname interface via WHM -> Home -> DNS Functions -> Add an A Entry for Your Hostname
          2. Enter your server’s IP address in the text box
          3. Click Add Entry

          Next, you will need to register the same nameservers on your Sangkrit.net account from your domain management section. You will need to change the nameservers of your domain to use these new domain nameservers.

          Simply log in to your Sangkrit.net account and follow these steps:

          1. Visit your products page, in the Domains heading, click Manage
          2. Locate the domain for which you wish to set up your nameservers
          3. Click the settings icon and select Manage DNS.
          4. Click the Settings tab and click Manage under the Host Names setting
          5. Click Add Hostname and enter the primary nameserver’s name (for example, ns1)
          6. Enter the primary nameserver’s IP address in the IP Address text box and click Add.
          7. Now, repeat the same steps for your secondary nameserver, this time use another nameserver such as ns2
          8. Click Save. Then, click Edit Nameservers and select Custom option
          9. Enter the full names of your two nameservers. (For instance: ns1.example.com and ns2.example.com)
          10. Click OK and then Save your changes

          That’s it. The DNS propagation takes some time to spread the domain’s new DNS records across the internet. So, allow it twenty-four hours and your settings will start to work.

          How To Configure Reverse DNS On Your WHM Server?

          DNS i.e., the Domain Name Server also known as Domain Name System is the hierarchical and decentralized system of identifying systems reachable through the Internet Protocol networks.

          It works by looking up your website by finding its domain name and then locating its associated IP address. Whereas, the reverse DNS first looks up for an IP address and then locates the associated domain name.

          The reverse DNS is actually a process that involves the conversion of an IP address back into a domain name. While the traditional DNS translates domain names (like – example.com) into IP addresses (like 132.0.3.1), reverse DNS does the opposite – it translates IP addresses into domain names.

          The Reverse DNS is mainly used for:

          1. Email Servers: Reverse DNS is commonly used by email servers to verify the legitimacy of incoming emails. Many email servers check if the reverse DNS entry of the IP address sending the email matches the domain from which the email claims to be sent. This helps in preventing spam and identifying potential sources of malicious or fraudulent emails.
          2. Network Troubleshooting: Network administrators use reverse DNS to understand the domain names associated with specific IP addresses. This can aid in troubleshooting network issues, identifying the source of network problems, or verifying the ownership of particular IP addresses.
          3. Security: Reverse DNS can provide additional information about the server sending traffic to your network. It’s used in security measures to analyze and filter incoming traffic based on the domain names associated with the IP addresses. This can be helpful in identifying and blocking potentially harmful or unauthorized access attempts.
          4. Logging and Analytics: Some systems and applications use reverse DNS to log the domain names of incoming connections, providing more meaningful information in logs and analytics.
          5. Online Reputation: Some online services use reverse DNS as a factor in determining the reputation of an IP address. A well-configured reverse DNS entry can contribute positively to an IP address’s reputation, while a lack of reverse DNS or misconfigured entries might affect it negatively.

          Setting up reverse DNS involves creating a PTR (Pointer) record in the DNS zone files, and linking an IP address to a domain name. This PTR record helps establish a connection between the IP address and the domain name it represents.

          It’s important to note that the accuracy and presence of reverse DNS entries can vary. Some organizations maintain proper reverse DNS entries for their IP addresses, while others might not. Additionally, the process of setting up and managing reverse DNS might involve coordination with the hosting provider or internet service provider.

          But at Sangkrit.net you don’t have to worry about that, you can easily setup the reverse DNS by following a few easy steps, and the round-the-clock online support is also available to help you in case you feel stuck anywhere.

          How To Setup Reverse DNS?

          At Sangkrit.net, you can easily set up a reverse DNS (RDNS) lookup for your Dedicated Server. To start, simply login to your Sangkrit.net account and follow these steps:

          1. Visit your My Products page
          2. Click Servers
          3. Next to your server, click Manage
          4. Enter the domain name you want to be associated with the server IP address, in the DNS record field
          5. Now click Update

          The system will start an automated process of completing the reverse DNS setup. This can take up to 48 hours for the changes to propagate to your server.

          If you have multiple IP addresses on your server, repeat the process for each IP address you want to set up Reverse DNS for.

          Now the traditional process of setting up reverse DNS is a little bit different, you may follow that also:

          1. Log in to WHM: Access your WHM control panel using your administrator credentials.
          2. Navigate to “DNS Functions”: In WHM, search for or locate the “DNS Functions” section. This is where you’ll manage DNS-related settings.
          3. Edit DNS Zone: Under “DNS Functions,” click on “Edit DNS Zone.” This will allow you to modify the DNS zone files for the domain.
          4. Select IP Address: Choose the IP address for which you want to set up Reverse DNS (PTR record). Click “Edit.”
          5. Add PTR Record: In the DNS zone editor, you’ll see the existing DNS records. To add a PTR record, scroll down to the “Add New Entries Below this Line” section.
          6. Enter PTR Record Details: Fill in the following information to create the PTR record: Name: Enter the last segment of the IP address in reverse, followed by “in-addr.arpa.” For example, if the IP is 192.0.2.1, the name would be “1.2.0.192.in-addr.arpa.” TTL: Set the Time to Live for the record.
          7. Save Changes: Once you’ve entered the PTR record details, click the “Save” or “Save Zone File” button to save the changes.
          8. Update DNS Zone: After saving the changes, WHM will update the DNS zone file with the new PTR record.
          9. Verify PTR Record: You can verify the PTR record by using the “dig” command in the terminal or through online DNS lookup tools. It might take some time for the DNS changes to propagate across the internet.

          You should also know that, when you run your own email server, and configure DNS to point to your domain name, there are some servers that are going to reject emails from IP addresses when not having an rDNS. The reverse DNS also helps when you need to troubleshoot your network while running a traceroute etc.

          Reverse DNS is a useful mechanism that adds an extra layer of information and security to online communication and networking processes.

          How To Backup And Restore Your Website On cPanel Hosting Or Server?

          cPanel provides you with powerful website backup and restore options with which you can back up your complete website, get backup notifications, and then easily restore your website whenever needed. There are two backup options in cPanel: Full Backup and Partial Backup.

          Full backup creates an archive of all website files and configurations set on your website. This can be used for moving your account from hosting to a dedicated server or VPS or to keep a local copy of your website files.

          Full backups cannot be restored through your cPanel interface. Hence, to restore full backups you have to manually upload files and import the MySQL database.

          cPanel of Sangkrit.net provides you with all video tutorials and you can easily view them right from the home screen of your cPanel.

          Partial backup is another feature that allows you to back up your website but here you can select what you want to backup. You can separately backup and download your Home Directory, MySQL Databases, Email Forwarders, and filters.

          Backups can be downloaded or restored from the ‘Backups’ page, you can access it from the Files section of your cPanel.  It allows you to download backups to your computer as a zipped copy of either your entire site including your home directory, databases, email forwarders configuration, and email filters configuration, or one of the previously mentioned parts of your site.

          How To Backup Your Website?

          Login to your Sangkrit.net account and launch your web hosting cPanel.

          My Account

          Enter the username & password and log in to your cPanel.

          cPanel Login

          Click ‘Backup Wizard’ from the ‘Files’ section.

          Backup Wizard

          It presents you with backup and restore options. (The restore option allows you to restore your website files or database from earlier generated backup files.).

          Restore & Backup Page

          Again it presents you with two options: Full Backup and partial site backups.

          Full backups create an archive file containing files and configurations of your website. Whereas partial backup allows you to separately create and download backups of website files, databases email forwarder filters, etc. The good thing about partial backups is that cPanel provides a quick direct feature for restoring partial backups.

          cPanel Full & Partial Backup Options

          Select a backup option, wait for some time and it will provide you download links for your backup files.

          cPanel Partial Backup

          If you have selected full backup then you may also enable email notification (on the full backup screen) and the system will send you an email upon completion of your website backup.

          cPanel Full Backup

          It’s not necessary to download backup files at the same time. All backups are saved in your server and can be accessed from the backups page of your cPanel’s ‘Files’ section.

          You can manage/download backups anytime by visiting cPanel and clicking the ‘Backups’ icon. It provides you with options for downloading saved backups. Also, you can generate or restore backups from there itself.

          How To Restore a Backup?

          As we have already said cPanel provides you the built-in option for restoring backup files (generated manually or via cPanel’s Partial Backup option) for the home directory, MySQL databases, and Email Forwarders and filters.

          From your cPanel home, Click ‘Backup Wizard’ under the ‘Files’ section

          Backup Wizard

          Select the restore option, it allows you to restore your website files or database from earlier generated partial backup files.

          Restore & Backup Page

          You can select what to restore like your Home Directory, MySQL Databases, Email Forwarders, and filters.

          cPanel Restore Wizard

          For Example: Suppose you want to restore your MySQL database from its downloaded backup file on your computer’s hard disk.

          cPanel Backup Browse & Upload

          Simply click ‘MySQL Databases’ and use the ‘Browse’ and ‘Upload’ buttons to restore the backup back to your server.

          Transferring Your Websites Between Hostings On Your Server

          The manual transfer requires you to download files as well as the database and then upload them to your new server. But there is another method on dedicated servers that allows you to copy your account directly from your previous cPanel host.

          What You Will Need?

          To start you will need your server address (IP or FQDN) which you can either find yourself or get from your service provider. Second, you are going to need the username and password of your cPanel account.

          How To Start?

          Log in to your SANGKRIT.net account and follow these steps:

          1. Open the Products page and click the Servers tab
          2. Click Launch (Next to the account, you want to use)
          3. Click Manage Server (WHM) (visible next to cPanel Site)
          4. Click Proceed

          On your WHM panel use the left side navigation search box to find the page ‘Copy an Account From Another Server With an Account Password’. On this page, you will see fields for the Server to copy from, username, and password.

          On the ‘Server to Copy’ field enter the IP address of your remote server. Next, fill in the username and password then press the ‘Copy Account’ button.

          In case you have an additional IP address assigned to your server. You can also select the ‘Give new account an IP address’ option to get the available IP address automatically assigned to your new account.

          How Does It Work?

          The server will try to connect to the remote cPanel server and copy the specified account.

          It is going to check the remote server every minute till the backup is completed. So at the time the copy process goes do not close your web-browser tab.

          How Much Time Does It Take?

          The time it takes depends on the size of your account on the remote server and once the account is successfully copied you will see the account restored message.

          How To See Your Newly Transferred & Restored Account?

          Once you see the account restored message at the bottom of the page. Use the top-left search box to type ‘list’, then click on the ‘List Accounts’ option. You should now see the copied account on your server.

          How To Make It Work?

          Once you have made sure that your old account has been copied to your new server at SANGKRIT.net. You will need to update your domain’s name servers to make your domain point to this new location.

          In case you need any kind of assistance in transferring your website, simply contact the support of SANGKRIT.net via the Support Page or Helpline numbers.