Shipping classes in WooCommerce are used for grouping similar products and used by some shipping methods, such as Flat Rate Shipping etc to offer different rates to different product classes.
For instance – If you are using shipping classes, it becomes possible for you to create different flat rate costs for different product types such as bulky items and light items.
How To Add Shipping Classes?
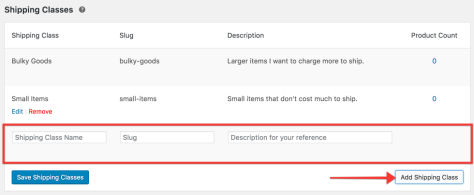
Login to your admin area dashboard and open your store settings page then navigate to Shipping -> Shipping Classes section.

To add a new shipping class enter a Shipping Class Name, description and save.
Now for assigning shipping classes to your products visit ADD NEW product screen or open existing product to edit. Here you will see shipping class both on simple and variable product options, each product can have one shipping class.


Same can also be done in bulk from All Products page – select multiple products, select EDIT from bulk actions followed by APPLY button. Then select a shipping class and update changes.


